
Table of Contents
- 1 Introduction
- 2 Prerequisites
- 3 Step 1: Upgrade your system to latest version
- 4 Step 2: Verify if Java already installed in the system
- 5 Step 3: Install Java on Ubuntu using apt
- 6 Step 4 – Create New Tomcat User
- 7 Step 5: Install Tomcat Server
- 8 Step 6 – Configure Tomcat User
- 9 Step 7 – Enable Remote Tomcat Access
- 10 Step 8: Create a Tomcat Systemd Unit File
- 11 Step 9: Access the Tomcat Web Interface
Introduction
Tomcat is a popular open-source web server and servlet container developed by the Apache Software Foundation. It is widely used for deploying and running Java-based web applications, including Java Server Pages (JSPs) and Java Servlets. Tomcat is developed and maintained by an open community of developers under the auspices of the Apache Software Foundation.
We will show you today how to install Tomcat on Ubuntu and configure it to use for production step by step. At the time of writing this blog Tomcat 10 is latest version and stable release. If you are installing lower or upper version, Process of installation will be the same.
Prerequisites
Before we start the installation, ensure that your Ubuntu system meets the following requirements :
- A Running Ubuntu Server
- SSH access with sudo Privileges
- Java 11 or higher version
- Minimum 1GB of RAM and 512 MB or more storage is recommended
- Web Browser to Access Tomcat Web Interface
Step 1: Upgrade your system to latest version
Before you begin the installation process, it’s a good idea to update your system’s package list and upgrade any existing packages to their latest versions. Open a terminal and run the following commands :
sudo apt updatesudo apt upgrade -yOnce the system upgrade completed, We will check whether Java is already installed in the system.
Step 2: Verify if Java already installed in the system
To check Java, Run the following commands :
java -versionIf Java is already installed, You will get below like output with Java version details :

Else if Java is not installed in your system you will get below like output :
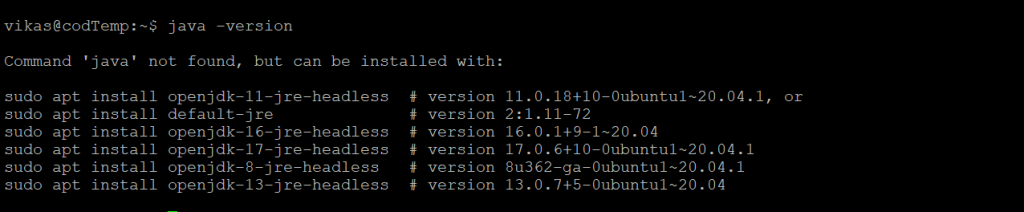
I am considering you don’t have Java installed. If you have already installed Java then you can skip Step 3.
Step 3: Install Java on Ubuntu using apt
You can install required versions of OpenJDK using following commands :
In this case we are installing JDK – 11 but to install specific version read How to Install Different Versions of Java and run the following command :
sudo apt install default-jdk -yAfter successful installation we need to verify the Java installation and it’s version. To do that we can run Step-2 command or run below command :
java -versionIf Java successfully installed than we should see the output as shown below with Java version details :

Step 4 – Create New Tomcat User
We will create the new dedicated user for Tomcat.
It is recommended to run Tomcat server with a dedicated user account for security purposes mainly for production deployments.
Create new user account using following command :
The following command will create a User and Group with the name tomcat in our system. If you want other name you can change it as per your requirement.
sudo useradd -m -d /opt/tomcat -U -s /bin/false tomcat Step 5: Install Tomcat Server
We will install the latest Tomcat server using wget, So it will be good to verify latest Tomcat version from the official download page. At the time of writing this blog Tomcat 10 is the latest version. Use the below command to download Tomcat 10.
wget https://archive.apache.org/dist/tomcat/tomcat-10/v10.1.7/bin/apache-tomcat-10.1.7.tar.gzIf you are installing other version of Tomcat you can replace the version number from above command.
You may see output as below :

After the download is completed, We will extract the downloaded archive and copy all content to the tomcat home directory using following command :
sudo tar xzvf apache-tomcat-10*tar.gz -C /opt/tomcat --strip-components=1 Once extraction process is completed, We will set the file permissions to Tomcat directory. Run the following command :
sudo chown -R tomcat:tomcat /opt/tomcat/sudo chmod -R u+x /opt/tomcat/binNow we have installed latest Tomcat server in the system.
Step 6 – Configure Tomcat User
We have to configure tomcat with user accounts in tomcat-users.xml to secure access of admin/manager pages.
Make sure to set strong password for admin and manager access.
To open tomcat-users.xml file run following command :
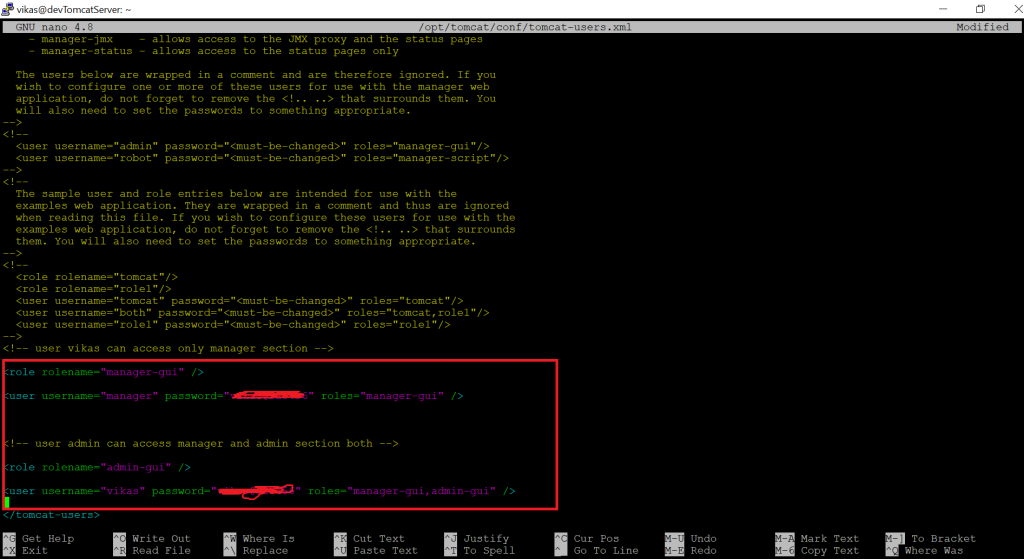
Paste the following code inside <tomcat-users> … </tomcat-users> tags. Make sure to change the password for admin and manager access.
<!-- user manager can access only manager section -->
<role rolename="manager-gui" />
<user username="manager" password="your-password" roles="manager-gui" />

<!-- user admin can access manager and admin section both -->
<role rolename="admin-gui" />
<user username="admin" password="your-password" roles="manager-gui,admin-gui" />
Save and Exit the file.
File preview has been attached below :
Step 7 – Enable Remote Tomcat Access
The default Tomcat manager and host-manager applications are accessible for localhost only. To allow access to these pages from the remote system, you need to modify the context.xml configuration file.
We can either allow a specific remote system or allow all. To Edit the context.xml file for Manager application run the following code :
sudo nano /opt/tomcat/webapps/manager/META-INF/context.xmlWe have already commented out the section added for IP address restriction to allow connections from anywhere.
Once the context.xml file is opened, Paste the following value to the file.
<Context antiResourceLocking="false" privileged="true" >
  <CookieProcessor className="org.apache.tomcat.util.http.Rfc6265CookieProcessor"
                   sameSiteCookies="strict" />
  <!-- <Valve className="org.apache.catalina.valves.RemoteAddrValve"
         allow="127\.\d+\.\d+\.\d+|::1|0:0:0:0:0:0:0:1" /> -->
</Context>
You may see the output as below :

Similarly, Edit the context.xml file for Host Manager application, Run the following code :
sudo nano /opt/tomcat/webapps/host-manager/META-INF/context.xmlWe have already commented out the section added for IP address restriction to allow connections from anywhere. Paste the following value in context.xml.
<Context antiResourceLocking="false" privileged="true" >
  <CookieProcessor className="org.apache.tomcat.util.http.Rfc6265CookieProcessor"
                   sameSiteCookies="strict" />
  <!--<Valve className="org.apache.catalina.valves.RemoteAddrValve"
         allow="127\.\d+\.\d+\.\d+|::1|0:0:0:0:0:0:0:1" /> -->
</Context>
Save and Close the file.
Step 8: Create a Tomcat Systemd Unit File
We will create a startup script to manage Tomcat as systemd service. Let’s create a tomcat.service file by running following command :
sudo nano /etc/systemd/system/tomcat.serviceOnce tomcat.service file is opened, Paste the following content in the file :
[Unit]
Description=Tomcat
After=network.target

[Service]
Type=forking

User=tomcat
Group=tomcat

Environment="JAVA_HOME=/usr/lib/jvm/java-1.11.0-openjdk-amd64"
Environment="JAVA_OPTS=-Djava.security.egd=file:///dev/urandom"
Environment="CATALINA_BASE=/opt/tomcat"
Environment="CATALINA_HOME=/opt/tomcat"
Environment="CATALINA_PID=/opt/tomcat/temp/tomcat.pid"
Environment="CATALINA_OPTS=-Xms512M -Xmx1024M -server -XX:+UseParallelGC"

ExecStart=/opt/tomcat/bin/startup.sh
ExecStop=/opt/tomcat/bin/shutdown.sh

[Install]
WantedBy=multi-user.target
File will like as below :

Here in User and Group are tomcat which we have created in earlier steps. You can change what you have set for yourself.
Save and Exit the file.
Now reload the systemd daemon service to load newly create files by running following command :
sudo systemctl daemon-reloadNow, start the Tomcat application for the first time.
sudo systemctl start tomcat.serviceNext, enable the tomcat service to auto-start for subsequent system boots. This is more important for the production deployments.
sudo systemctl enable tomcat.serviceNow, We have tomcat application is running on our system. You can verify the service status by executing the following command. Make sure the status is showing “active (running)“.
sudo systemctl status tomcat.serviceNow you may see the output as below :

The default Tomcat server runs on port 8080. So allow Port 8080 in Linux firewall using following command :
sudo ufw allow 8080/tcpNote : If you are setting up Tomcat on Linux VM on any cloud platform, You need to enable port 8080 in networking inbound port rule.
Step 9: Access the Tomcat Web Interface
As we have configured Tomcat in system, We can access web interface from browser. You can access tomcat interfaces by entering your server’s IP address or a domain name pointed to that server, followed by port 8080 in your browser.
Open your favorite browser and Use the following syntax :
http://server-ip:8080
If you are running SonarQube on local machine then use following syntax :
http://localhost:8080
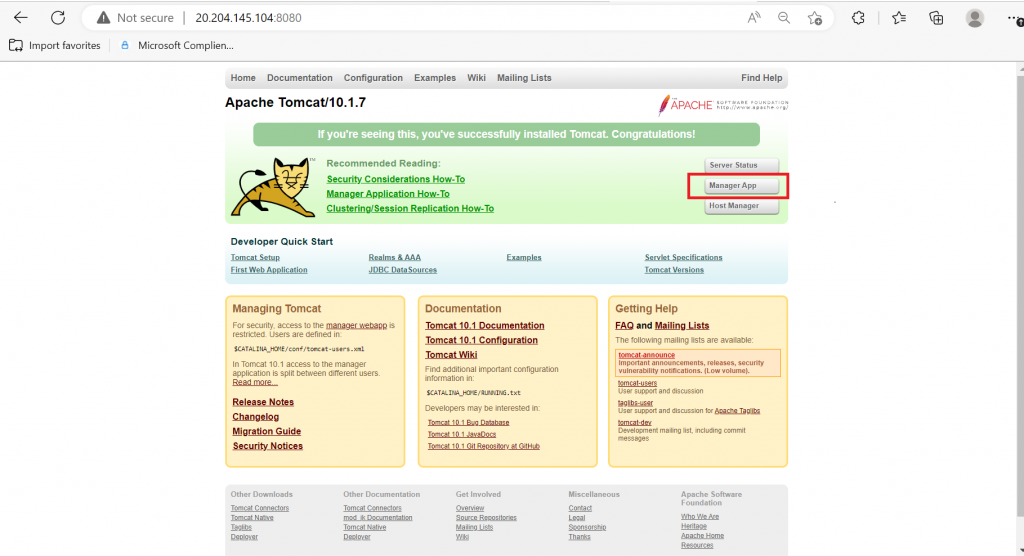
Now Tomcat will start in your web browser and will look like below snap :

Tomcat Manager App is a web application packaged with the Tomcat server application. The Manager interface provides us with the basic functionality we need to manage our deployed web applications.
Click Manager App button as shown in below image or directly type /manager in browser URL like http://server-ip:8080/manager.
You will be able to see below screen :

Similarly, Click on Host Manager button on home page or directly type /host-manager like http://server-ip:8080/host-manager.
Congratulations! You have successfully installed and configured Tomcat server on Ubuntu. You can now use it for your test environment or production as per your requirement.
If you face any difficulty or error by following these steps, Please write it down in comment section.


The logical flow of this post made it so easy to follow. I learned a lot—thank you!
This is the kind of post that levels up your skills.
Just implemented this—works like a charm!
This post is a masterclass in clarity.
You’re setting a great example for the community.
This aligns with SOLID principles perfectly.
You nailed the real-world application of this concept.
Great content as always!