Table of Contents
- 1 Introduction
- 2 Introduction: A Comprehensive Guide to Connecting Azure and AWS with a Site-to-Site VPN
- 3 Prerequisites
- 4 Phase 1: Configuring Azure
- 5 Phase 2: Configuring AWS
- 5.0.0.1 Step 1: Create VPC in AWS
- 5.0.0.2 Step 2: Create Subnet inside existing playdevops-vpc
- 5.0.0.3 Step 3: Create Route Table
- 5.0.0.4 Step 4: Create Internet Gateway
- 5.0.0.5 Step 5: Create a Customer Gateway
- 5.0.0.6 Step 6: Create Virtual Private Gateway
- 5.0.0.7 Step 7: Create Site to Site VPN Connection
- 6 Phase 3: Connecting Azure and AWS
- 6.0.0.1 Step 1: Create Local Network Gateway in Azure
- 6.0.0.2 Step 2: Edit Route Table in AWS
- 6.0.0.3 Step 3: Edit Route Table in Azure
- 6.0.0.4 Step 4: Create Network Security Group in Azure
- 6.0.0.5 Step 5: Create Security Group in AWS
- 6.0.0.6 Step 6: Create Virtual Machine in Azure
- 6.0.0.7 Step 7: Create EC2 in AWS
- 6.0.0.8 [Optional] – How to Setup Two Tunnel in Azure in Active Active Mode
- 6.0.0.9 Step 1 : Create another Public IP for Azure VPN Gateway
- 6.0.0.10 Step 2 : Enable Avtive Active Mode in Azure VPN Gateway
- 6.0.1 Quick Fix
Introduction
Introduction: A Comprehensive Guide to Connecting Azure and AWS with a Site-to-Site VPN
In today’s multi-cloud world, businesses often need to connect resources hosted in different cloud platforms seamlessly. Whether you’re running critical workloads in Microsoft Azure and Amazon Web Services (AWS) or expanding your hybrid cloud strategy, establishing a Site-to-Site VPN tunnel is a pivotal step toward achieving secure and reliable communication between these platforms.
This step-by-step guide simplifies the process, walking you through the exact steps to set up a Site-to-Site VPN tunnel between Azure and AWS. From configuring Azure’s Virtual Network Gateway to setting up AWS’s Customer Gateway, we’ll demystify the technical details to ensure a smooth and secure connection.
By the end of this guide, you’ll not only have a working VPN tunnel but also a deeper understanding of how these cloud giants handle networking and how you can leverage this to unlock greater flexibility for your organization’s infrastructure. Let’s dive in and bridge the gap between Azure and AWS!
Prerequisites
- Azure Account with Valid Subscription
- AWS Account with Admin Privilege
- Requirement Checklist of Configuration
We will Deploy this Tunnel in Total Four Phases
Phase 1: Configuring Azure
Step 1: Create Resource Group in Azure
Before creating any resources in Azure, it is essential to first create a Resource Group in the specified region based on your requirements. In this scenario, since all resources will be deployed in the US East region, the Resource Group should also be created in the same region.
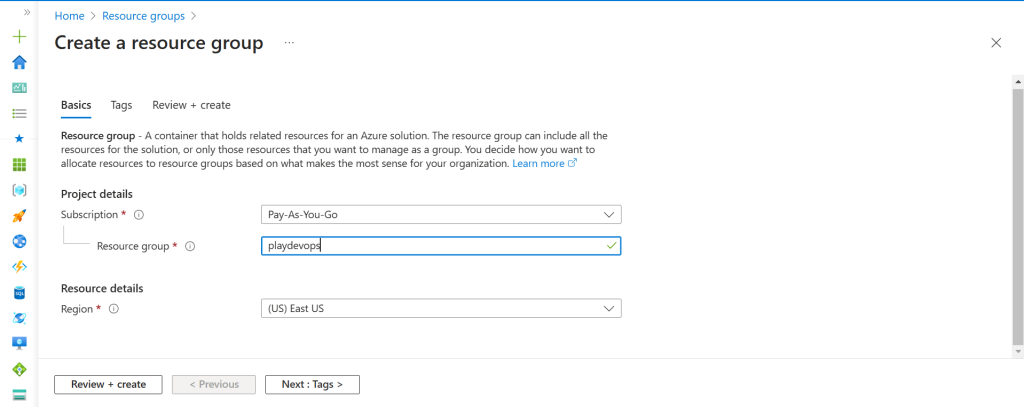
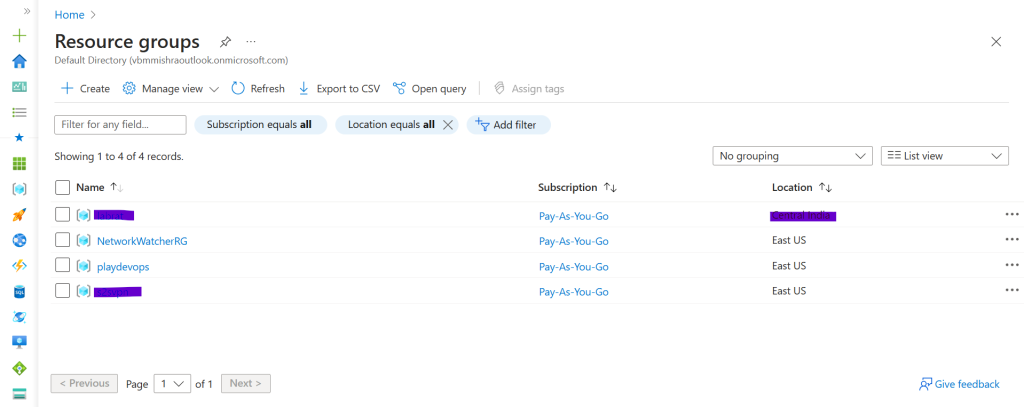
Once you create your Resource Group, it will be visible within the Resource Groups Blade.
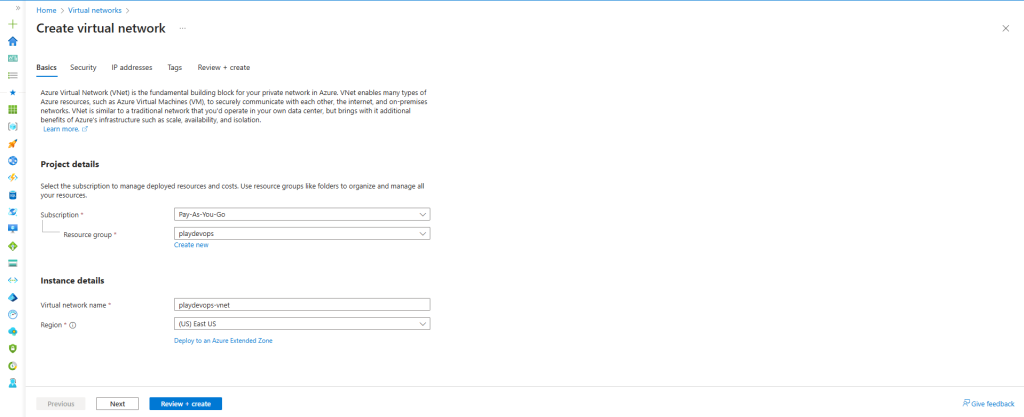
Step 2: Create Virtual Network and Subnets
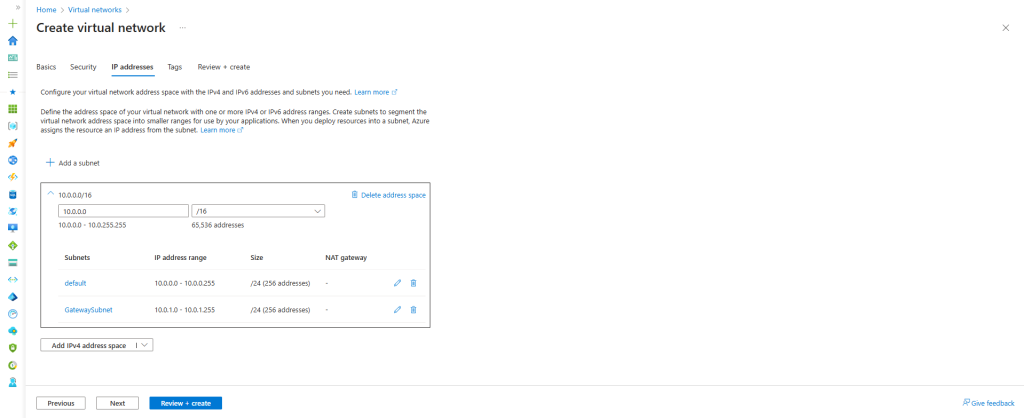
We need to create a Virtual Network (VNET) with two subnets: the first will be the Default Subnet, and the second will be the Gateway Subnet.
The Default Subnet and its CIDR block will be utilized for AWS configuration, while the Gateway Subnet is necessary for setting up a Virtual Network Gateway in Azure.
Step 3: Create Route Table
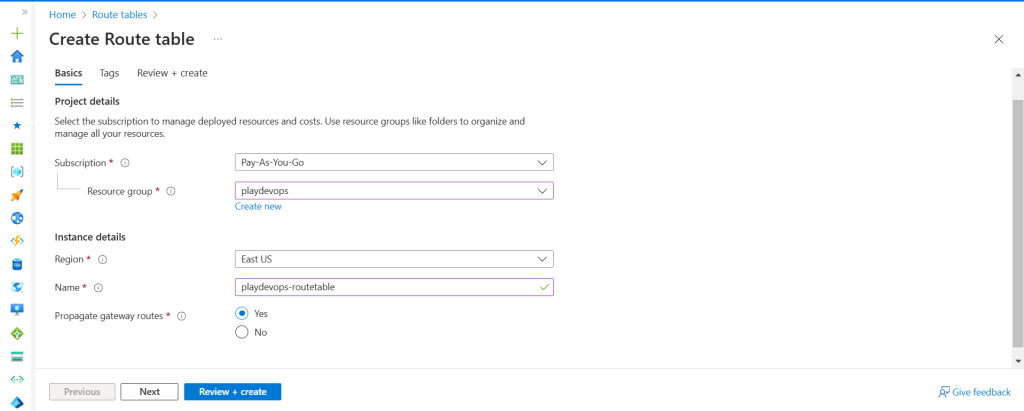
We need to set up a route table to direct traffic according to our specific requirements.
Choose the configuration displayed in the screenshot below, then click ‘Review and Create’.
Step 4: Create Virtual Network Gateway
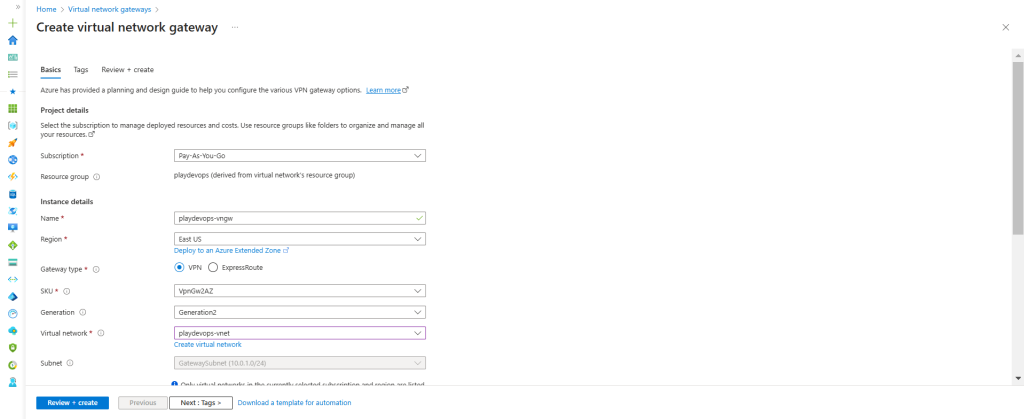
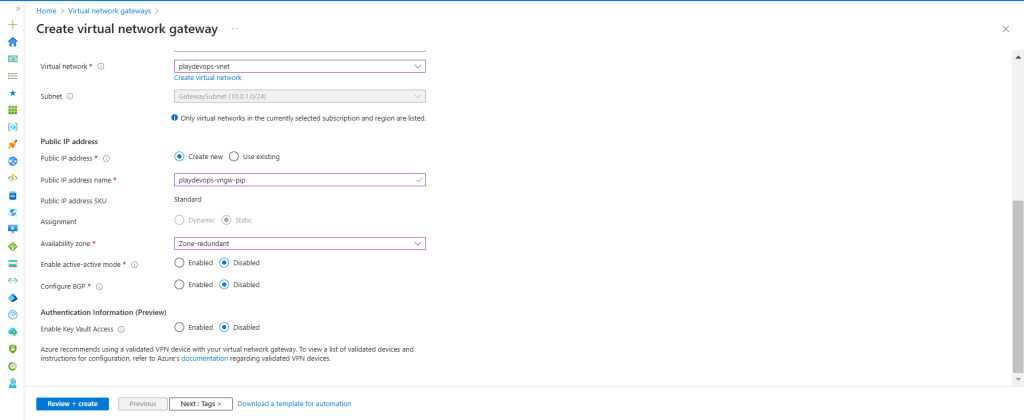
We need to set up a Virtual Network Gateway to securely transmit encrypted traffic between an Azure virtual network and on-premises locations or other public clouds via the public Internet.
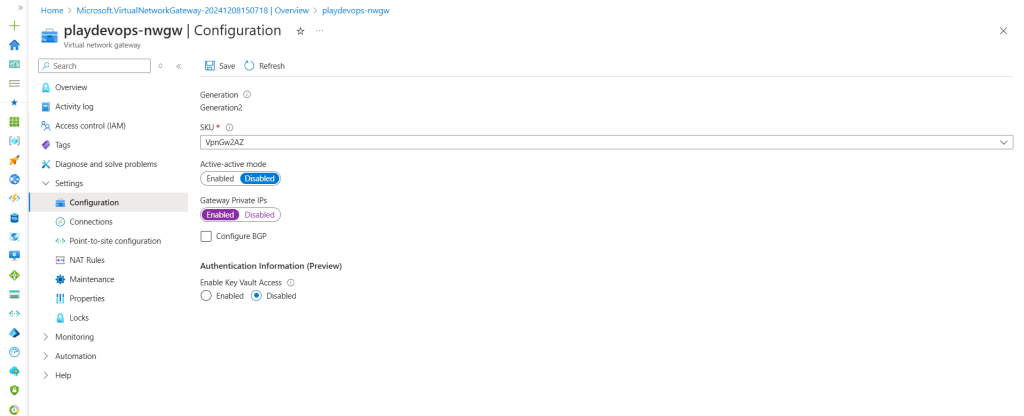
Optional – We will not enable Gateway Private IPs inside Virtual Network Gateway configuration at this time. If we are unable to connect to the Azure VM using its private IP after following all the steps, then only we will enable this setting. If we will enable Gateway Private IPs in the Virtual Network Gateway configuration, then we must also enable the “Use Azure Private IP Address” option in the Local Network Gateway connection configuration as shown in Phase 4 > Quick Fix
Phase 2: Configuring AWS
Step 1: Create VPC in AWS
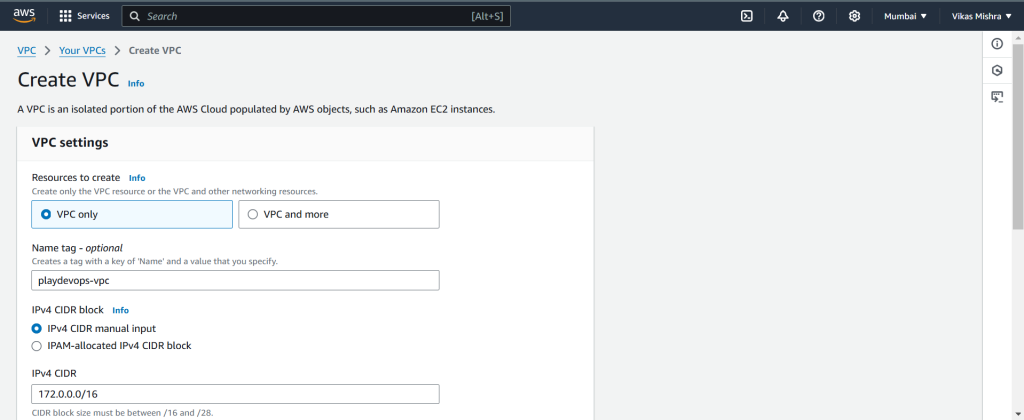
We will create all the resources of AWS in Asia Pacific (Mumbai), ap-south-1 region, You can create in region as per your requirement.
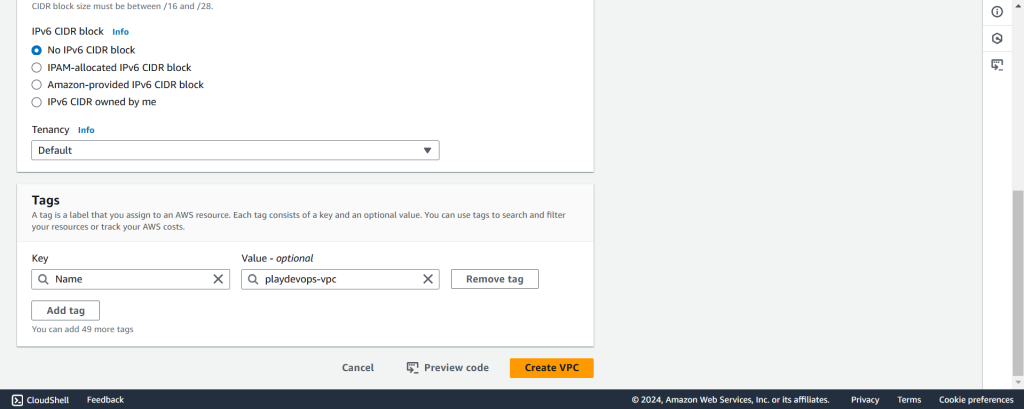
Name the VPC, Enter your preferred CIDR in IPv4 CIDR block and create VPC.
Step 2: Create Subnet inside existing playdevops-vpc
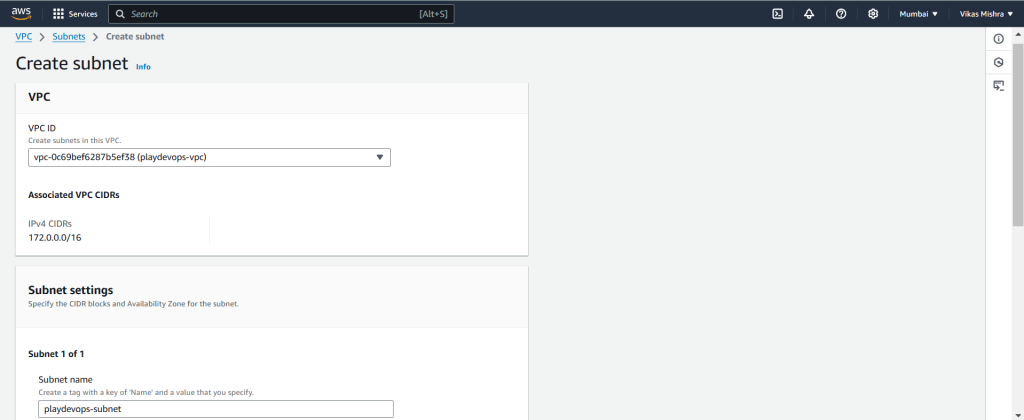
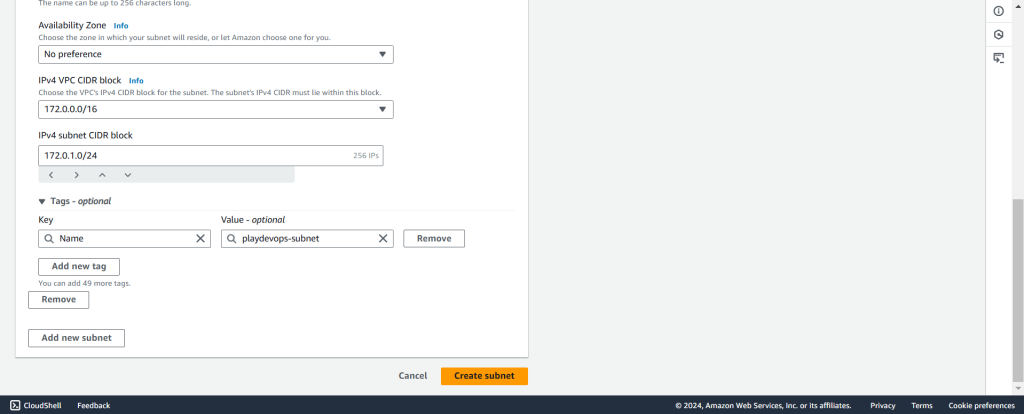
Choose the existing “playdevops-vpc” from the VPC ID dropdown, assign a name to the subnet, select the desired Availability Zone, input your subnet CIDR, and click “Create.”
Step 3: Create Route Table
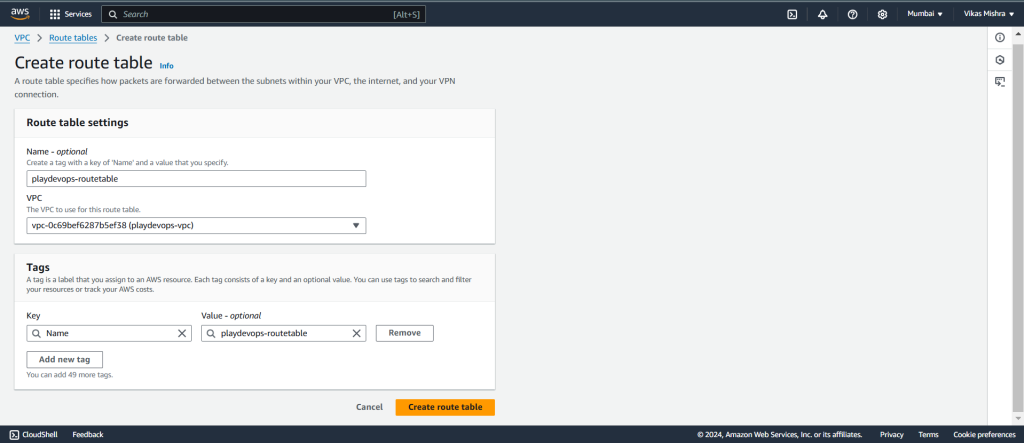
We need to set up a route table to direct traffic according to our specific requirements.
Assign a name to your Route Table and select existing VPC then hit on “Create route table”.
Step 4: Create Internet Gateway
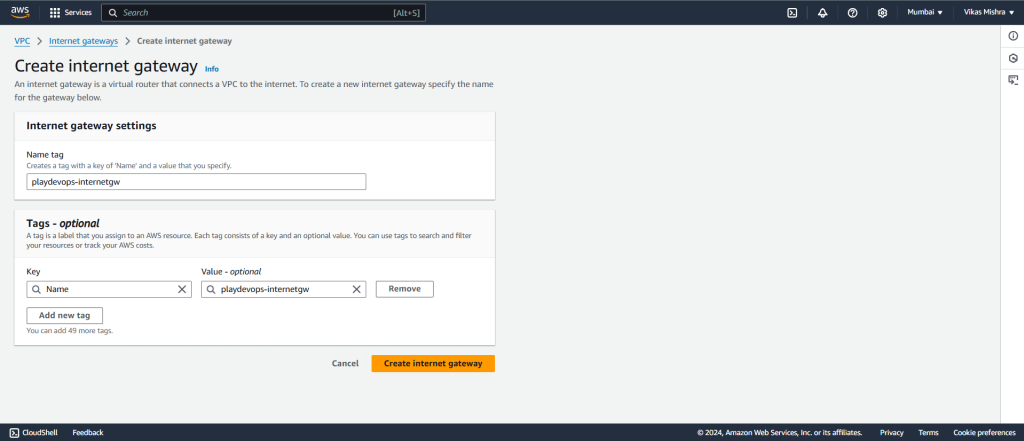
We are creating Internet Gateway to connect our VPC to internet so that our EC2 server can communicate with the outside resources via internet and we need to add this rule in our Route Table which will do in later steps.
For now assign a name to Internet Gateway and click on create.
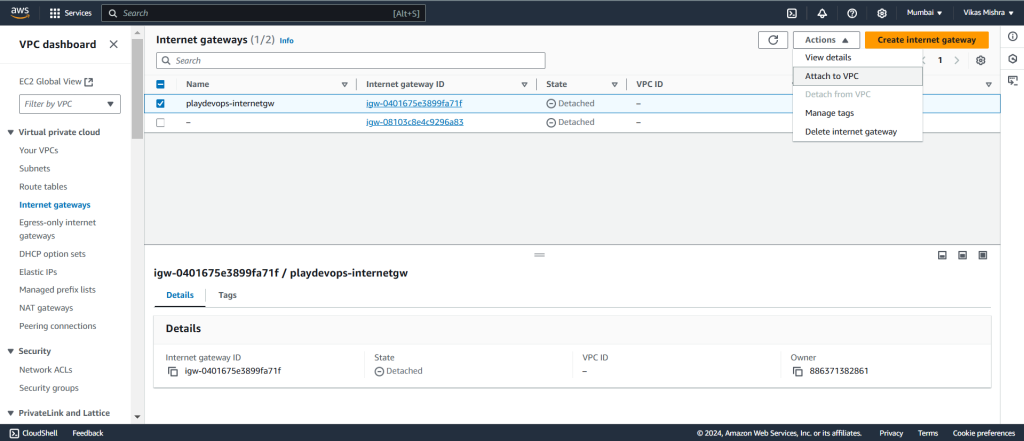
Once Internet Gateway has been created then we need to attach it with our VPC so that our server can communicate to outside resource via internet.
Select the newly created Internet Gateway and from Action dropdown click on Attach to VPC as shown in below snapshot.
As current State of Internet Gateway is Detached, Once attachment is successful the State will get changed to Attached.
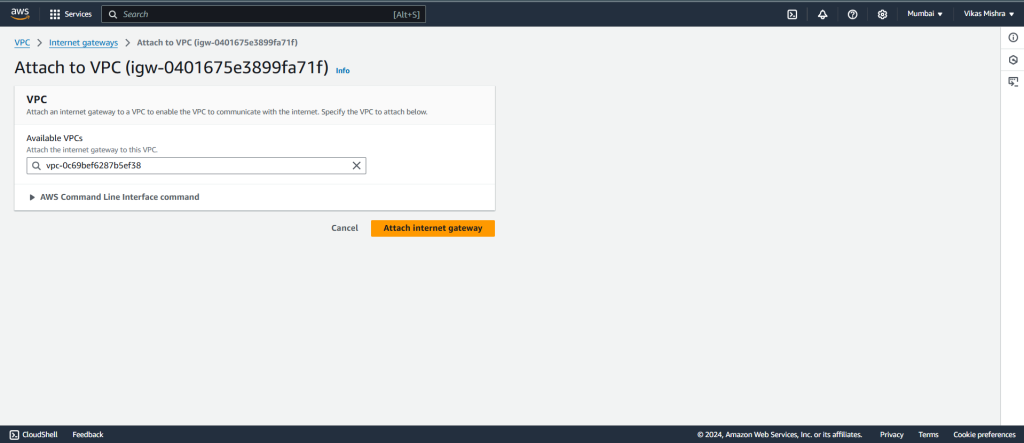
Once you hit on Attach to VPC, you might see below screen where you need to select the existing VPC and hit on Attach internet gateway.
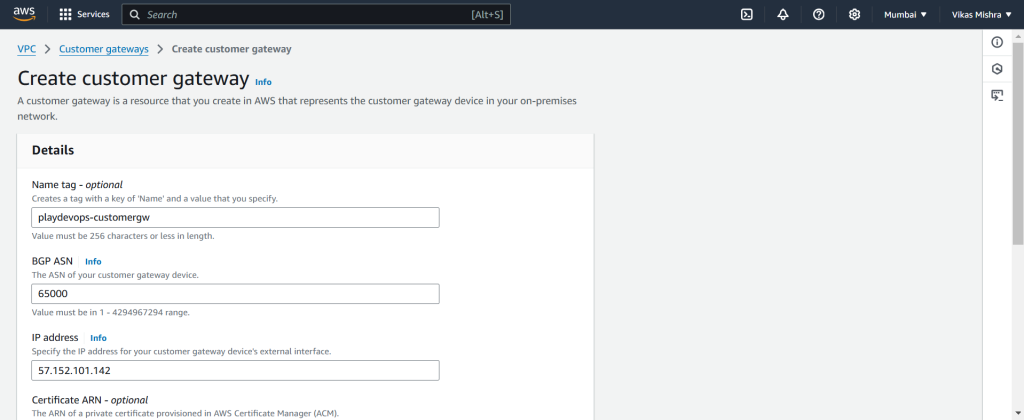
Step 5: Create a Customer Gateway
Now from VPC blade in left side menu, Select Customer Gateway.
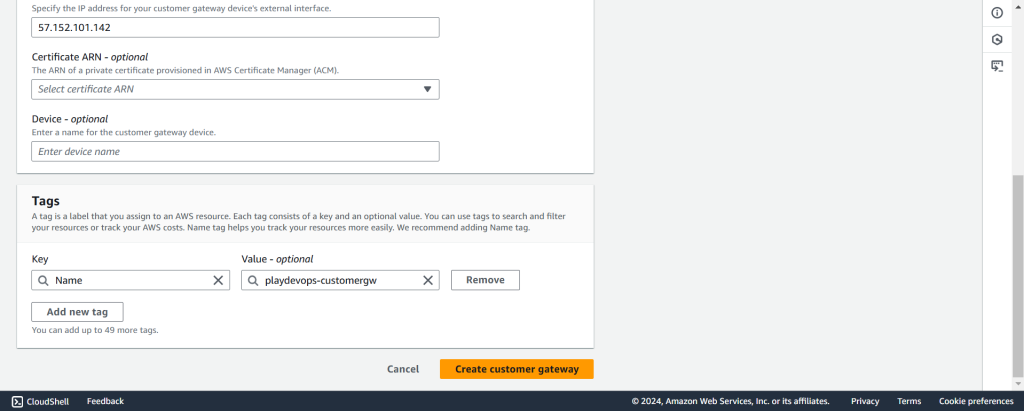
Assign a name, Enter the Public IP Address of Azure VPN Gateway inside IP address text field, leave other field default or you can change it as per your requirement. Now click on “Create customer gateway”.
Step 6: Create Virtual Private Gateway
Virtual Private Gateway is the simply a VPN connector on the Amazon side of Site to Site VPN connection.
So when we will create Site to Site VPN in next step, Virtual Private Gateway will be integrated along with Customer Gateway.
Assign a name and select Amazon default ASN if you don’t have Custom ASN in Autonomous System Number(ASN), and click on Create.
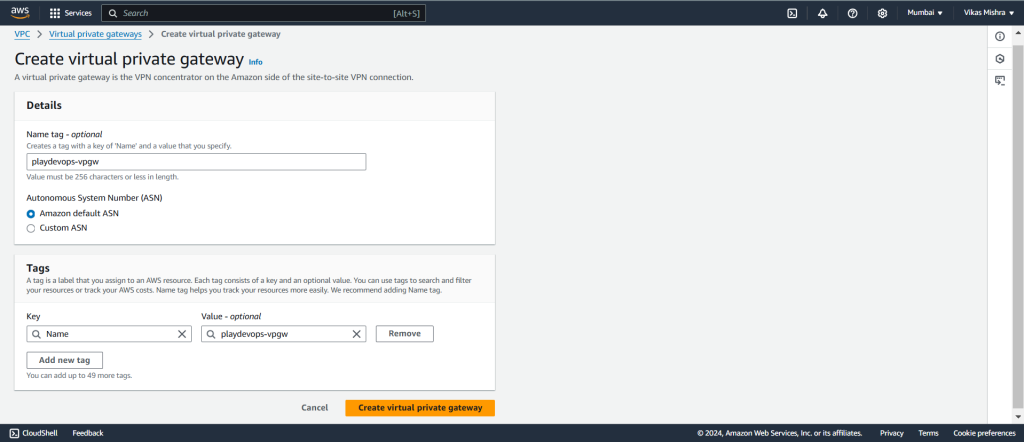
Once Virtual Private Gateway is created successfully then we need to attach it to our VPC.
Select the newly created Virtual Private Gateway and Attach to VPC from Action dropdown as shown in below snapshot.
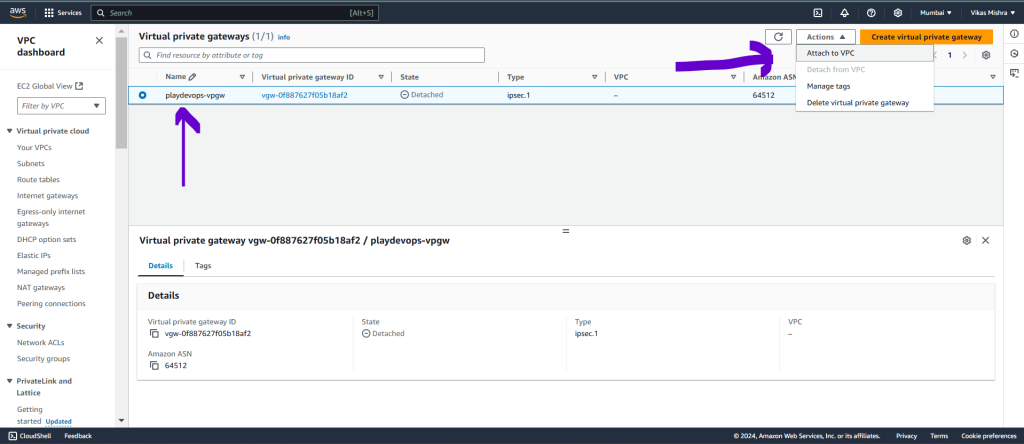
Now select the VPC and hit on Attach.
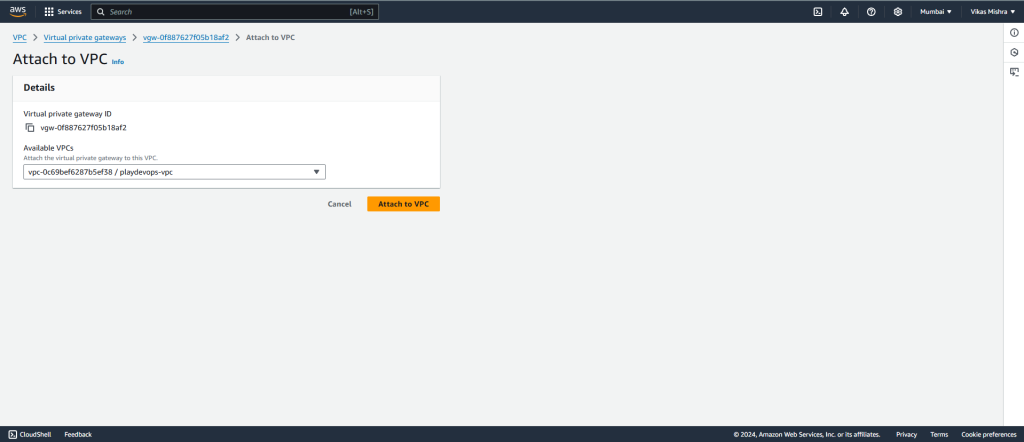
Once you attach the VPC, You will be able to see Attached status in Virtual Private Gateway dashboard.
Step 7: Create Site to Site VPN Connection
Now we will create Site to Site VPN and integrate with Customer Gateway and Virtual Private Gateway. Once the creation is successful, We need to download the configuration file which will be used to extract Pre Shared Key(PSK) and other details. We will see all these details in next steps.
Now, Select Site-to-Site VPN connections from VPC blade in left side menu.
Assign a name, in Target gateway type select Virtual private gateway and Customer gateway which we have created in previous steps as we need to integrate it with Site to Site VPN what we have discussed previously.
In the Routing option, select “Static,” as this is the option we’ll use in Azure. If you have custom requirements that require BGP, you can choose “Dynamic,” but keep in mind that you’ll need to enable BGP in Azure as well. In the “Static IP prefixes” field, enter the Azure Default Subnet CIDR, not the Gateway Subnet CIDR. Leave the optional field at its default setting.
You might be wondering why we are not configuring Tunnel 1 and Tunnel 2 here. The reason is that we don’t have a firewall in place, so we are using the default options. If we had a third-party firewall in Azure or AWS (e.g., Palo Alto Firewall), we would need to configure the tunnels based on the parameters provided by the firewall team, such as Encryption and Hash Algorithm, Diffie-Hellman Group, PSK, and BGP.
Since we’re using the default option, there’s no need to configure the tunnels at this stage. If you’re interested in configuring the tunnels based on the parameters from the firewall or network team, we recommend reading this blog.
Click on “Create VPN Connection” to proceed. Please note that it may take approximately 5 to 10 minutes for the connection to be created and become available.
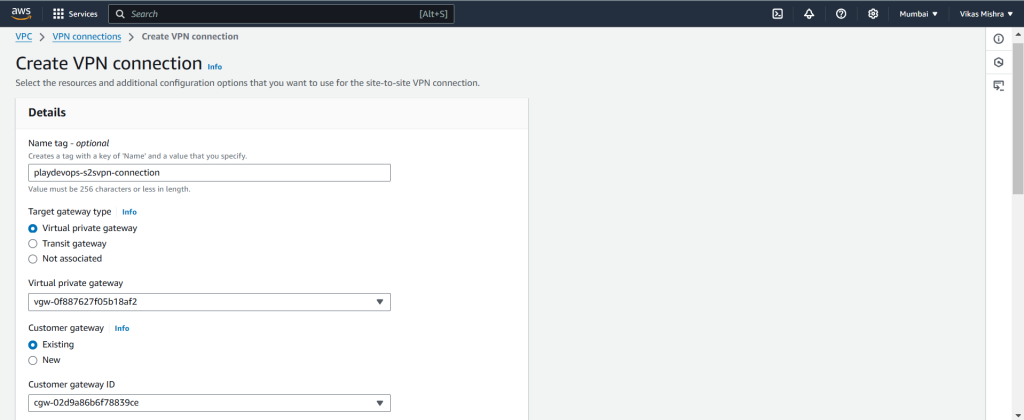
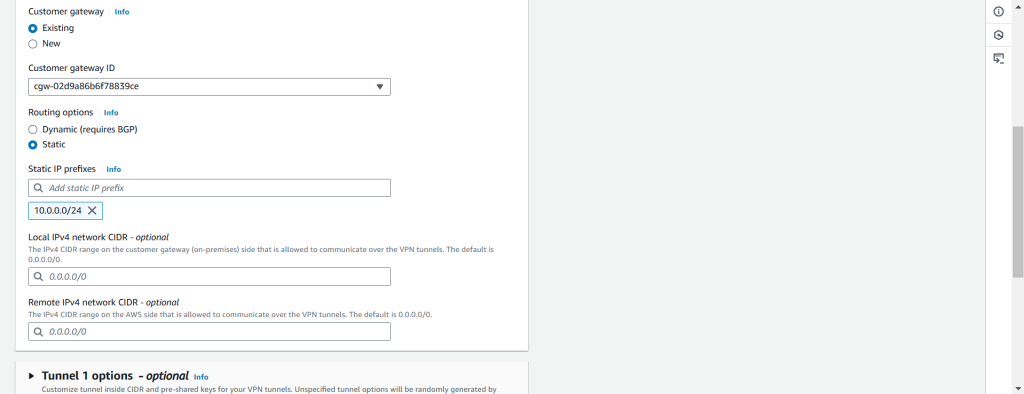

Once Site to Site VPN created and status is available then select the newly created connection and download the configuration file as we have discussed about this previously.
Now we need to get the Pre Shared Key(PSK) and other details from this configuration file. Please note we should not share this file to anyone as it contains crucial details about your tunnel configurations.
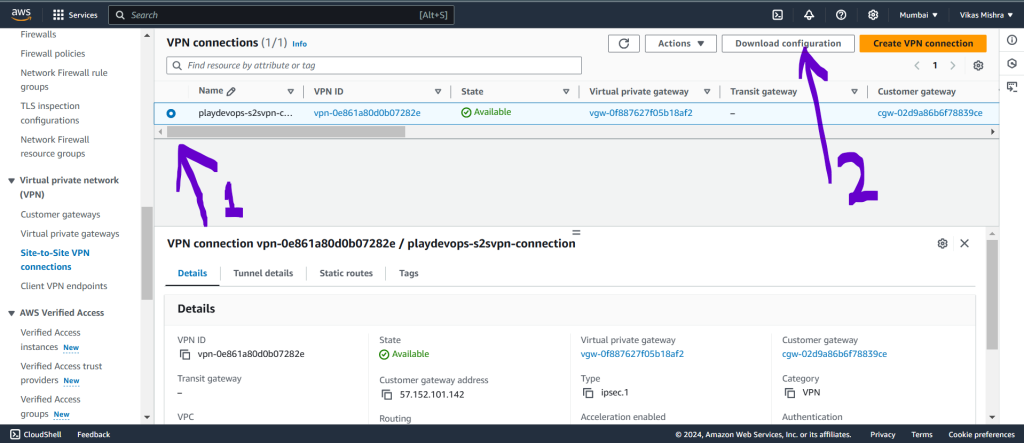
While downloading configuration file, We need to select Generic If you have not any Vendor or if there is no firewall in AWS environment, If there is any firewall is available such as Palo Alto or other, We need to download the configuration file for that particular vendor by selecting from dropdown and select IKE as per requirement. Here we will go with IKE 2 because in Azure we will prefer IKE2 only.
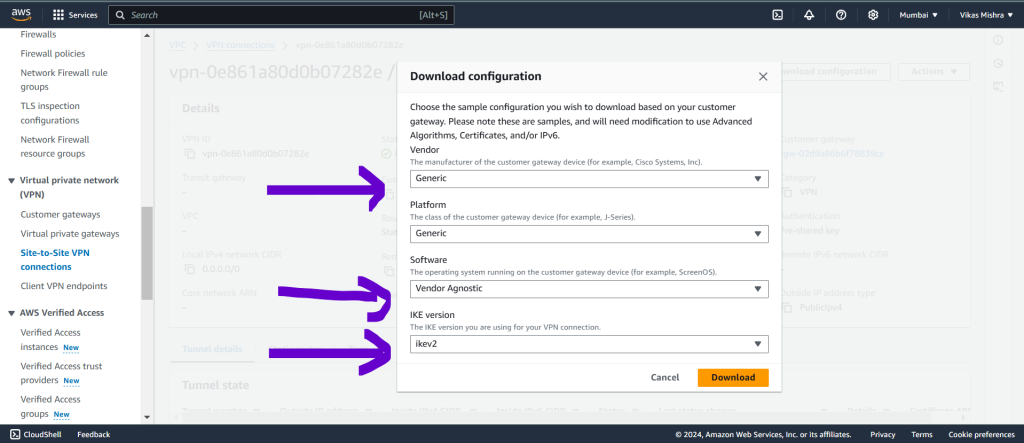
Now we have configuration file. Now we will setup connection between Azure and AWS where details from configuration file will be needed.
Phase 3: Connecting Azure and AWS
Now we need to create the Local Gateway and connection in Azure using Pre Shared Key(PSK) and Outbound IP of Tunnel 1 from Site to Site VPN in AWS which is available in configuration file downloaded from AWS.
Step 1: Create Local Network Gateway in Azure
For reference attached AWS Tunnel snap for Outbound IP, Copy Outbound IP of Tunnel 1 from AWS Site to Site VPN.

Now in Azure, Select existing Resource Group, Region, Endpoint as IP address, If you have domain name then select FQDN, in IP address enter Outbound IP of the tunnel 1 of AWS as shown in above snap. In Address Space(s), enter AWS VPC CIDR and hit on Next.
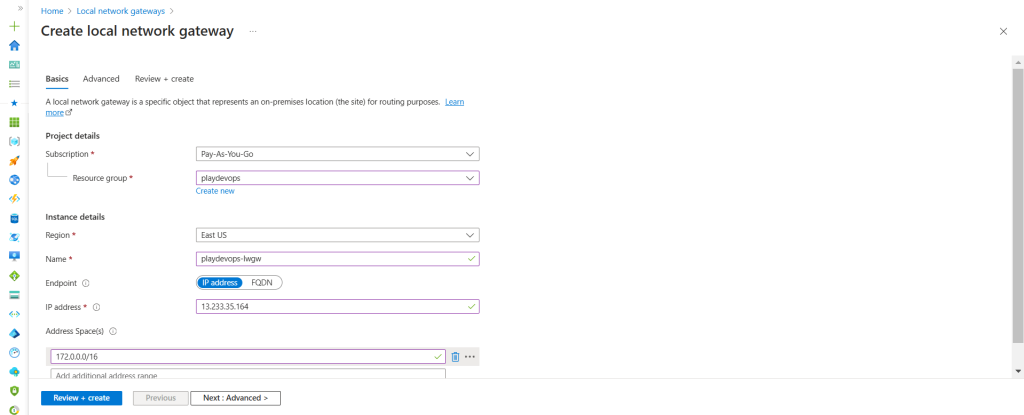
Now we have need to keep BGP setting as No because we have enabled Route as Static not Dynamic BGP in AWS, what we have discussed previously.
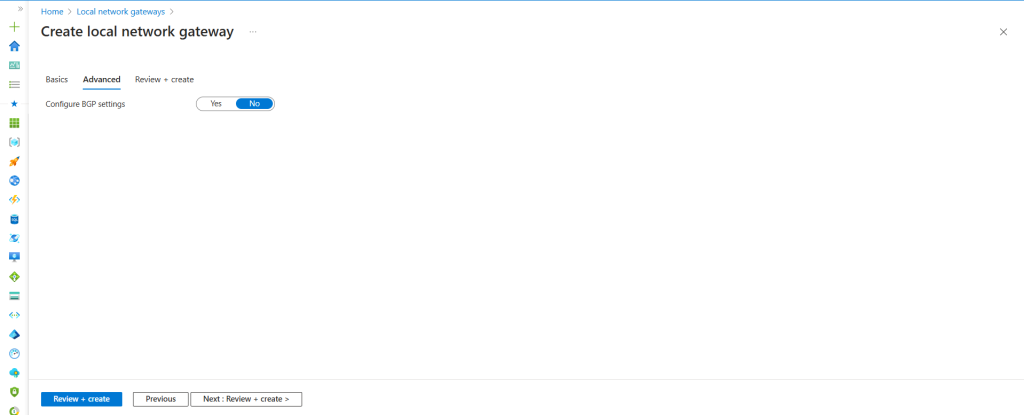
Now click Review and Create and hit on create.
Once Local Network Gateway created successfully then we need to create connection and configure it. Hit on Connections to create new connection.
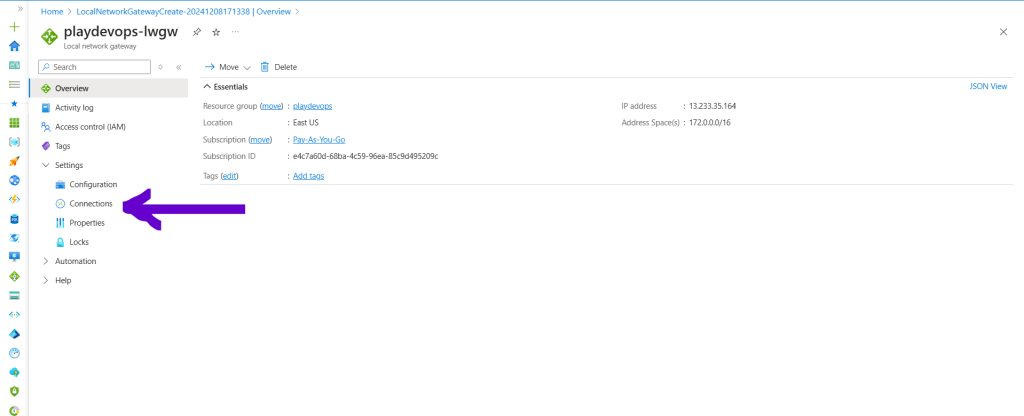
Select Connection type as Site to Site(IPsec), Assign a name to connection and hit on next setting tab
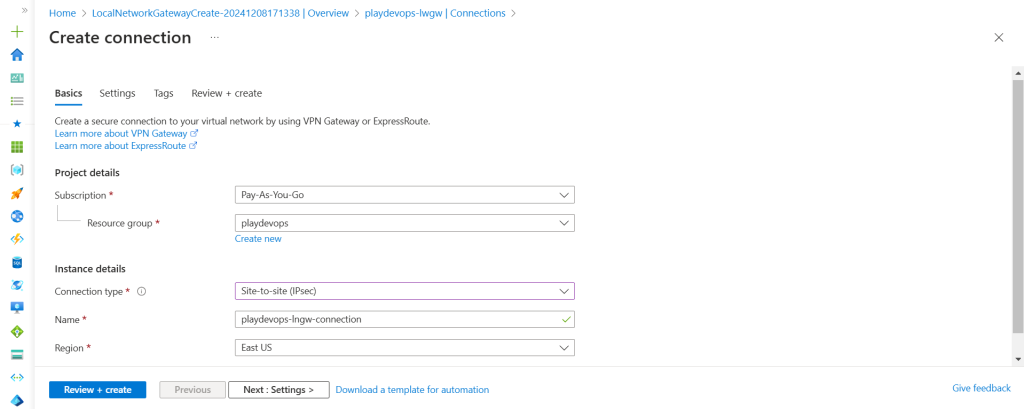
Now select existing Virtual network gateway and Local Network Gateway, Authentication Method will be Shared Key(PSK) as we have PSK available in configuration file which we have downloaded from AWS. Keep IKE protocol same as the configuration file(IKv2) because we have selected same in AWS while downloading the file. Rest of the details would be default or as per your custom requirement.

Here, While creating Connection, IPsec / IKE policy set as “Default” but we need to match all the attributes in Azure IPsec / IKE policy which we have received or downloaded from AWS VPN configuration file. Like below shown image
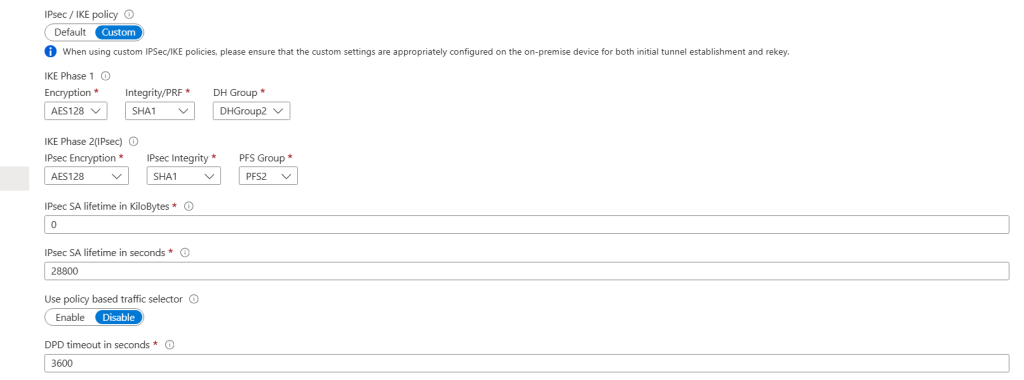
Once Attribute entered same as AWS VPN Config file then proceed further, In case if we select IPsec / IKE policy as “Default” by mistake, No worries, We can reconfigure it inside Local Network Gateway >> Connection. To see steps visit “Quick Fix” section.
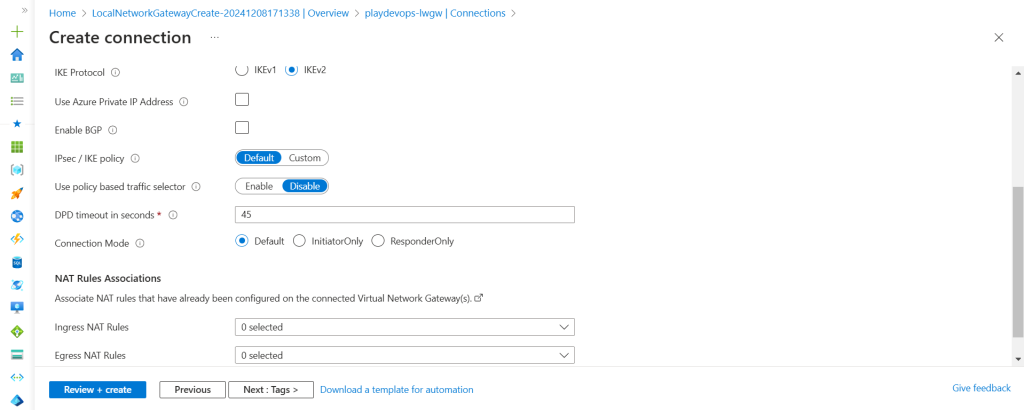
Now go Next and hit on create. Once the connection has been created successfully the we need to check the status as shown in below snap.
Initial status of the connection might be Unknown but after around 3 to 5 minutes the status will get updated to either Connected or Not Connected.
If the status is Connected then the configuration we have done is right but if the status is Not Connected then we might have made some mistake while configuring the setup so here are the two ways you can proceed.
1) We need to verify all the details of Phase 1 and Phase 2 and everything is alright then we need to scrap the resources what we have created from Phase 3 and recreate it by following the instruction from Phase 3.
2)If any of the details are not correct or you are not sure about it, Just scrap all the resources from Azure and AWS and recreate all the resource from scratch by following instruction from Phase 1.
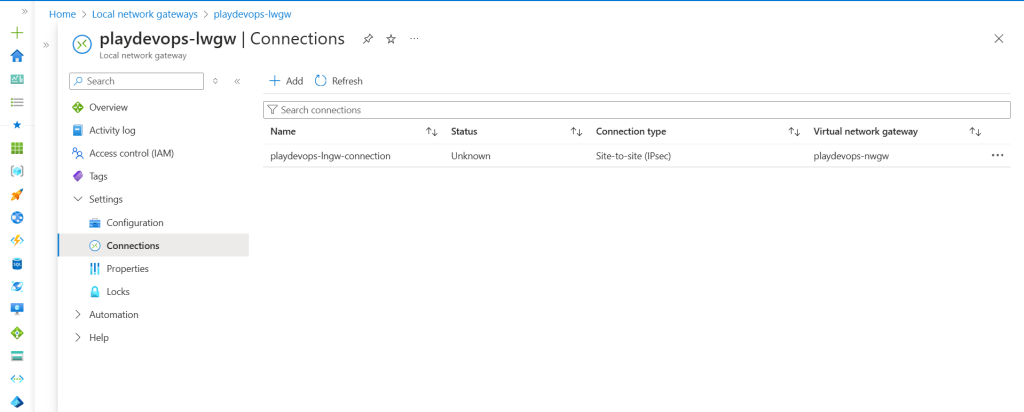
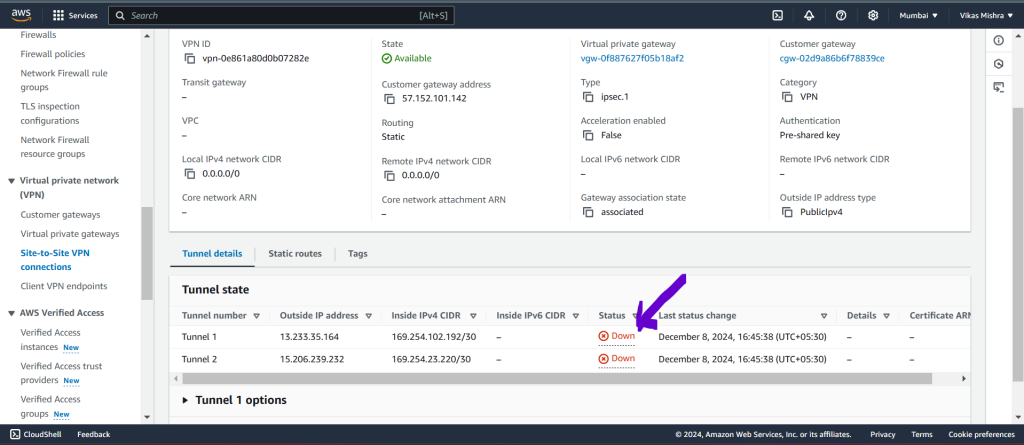
Now in this case, Initial status is Unknown hence status of Tunnel 1 in AWS is also Down. Here we will wait for around 5 to 15 minutes until we get the status of connection is Connected in Azure or Tunnel 1 status is UP in AWS.
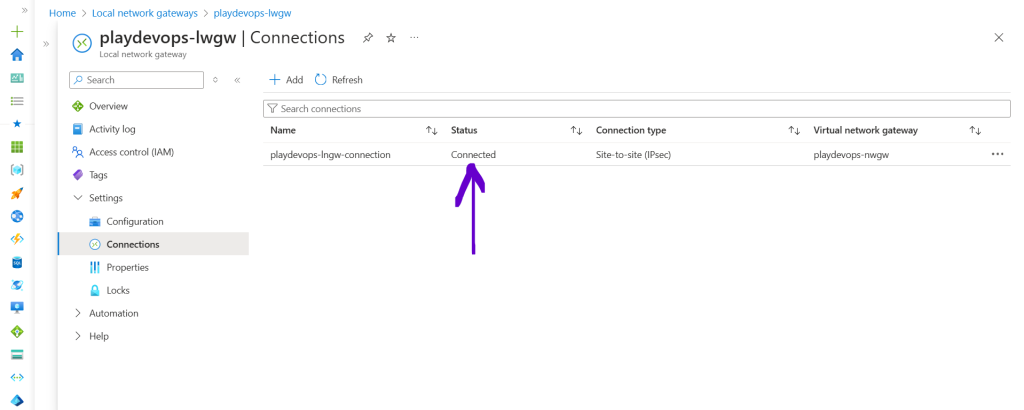
So after sometime we can see in below screenshot, The connection status is connected inside Local network gateway in Azure.
Now go to AWS and refresh the Site to Site VPN tab and status of tunnel 1 will get changed to UP as shown in below image. That means we have successfully configured the Site to Site connection between Azure and AWS.
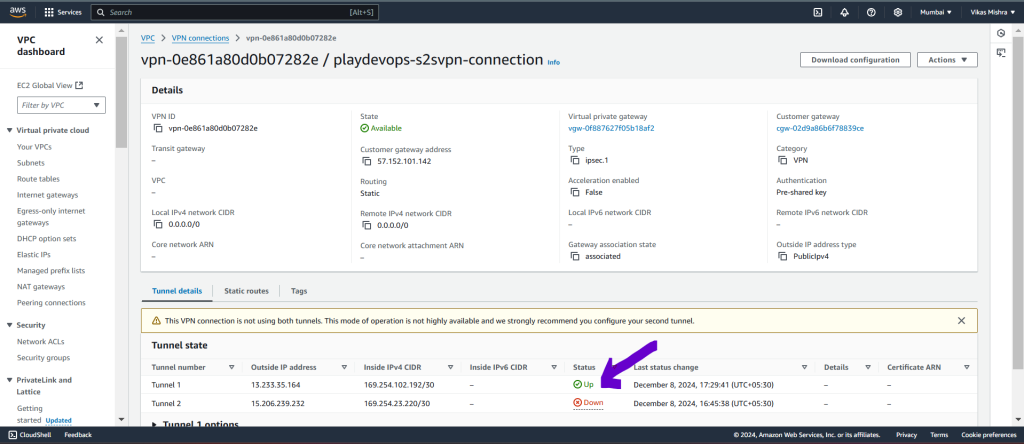
Here we have configured only one tunnel that is Tunnel 1, but we should configure both tunnel for high availability because lets say if Tunnel 1 goes down then we can uplift the Tunnel 2.
Step 2: Edit Route Table in AWS
Now we are done with the connection between Azure and AWS. Next we need to edit and configure route table.
Open the route table which we have created in Phase 2 > Step 3 and click on Edit routes as shown in below image.
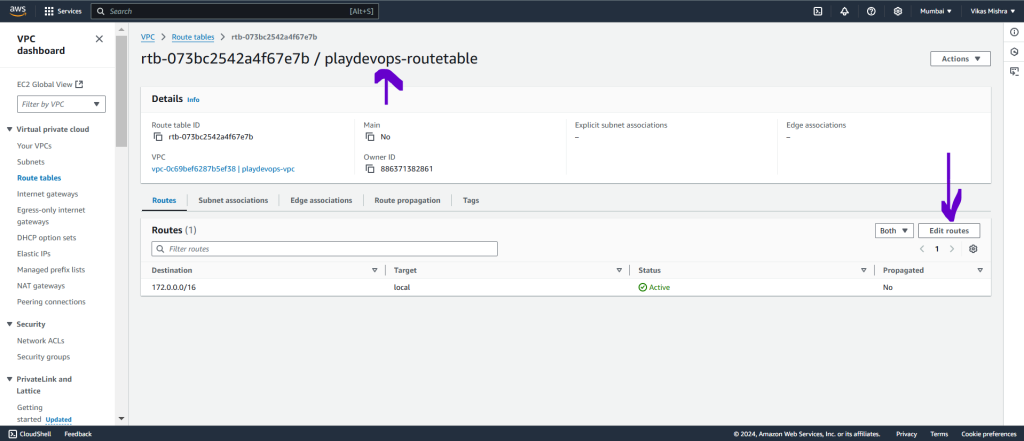
In destination add Azure VNET CIDR and in Target select Virtual Private Gateway.
In destination add Azure default subnet CIDR and in Target select Virtual Private Gateway.
In destination add Azure Gateway subnet CIDR and in destination select Virtual Private Gateway.
In destination add 0.0.0.0/0(All IP) and in destination select Internet Gateway. Click on Save Changes.
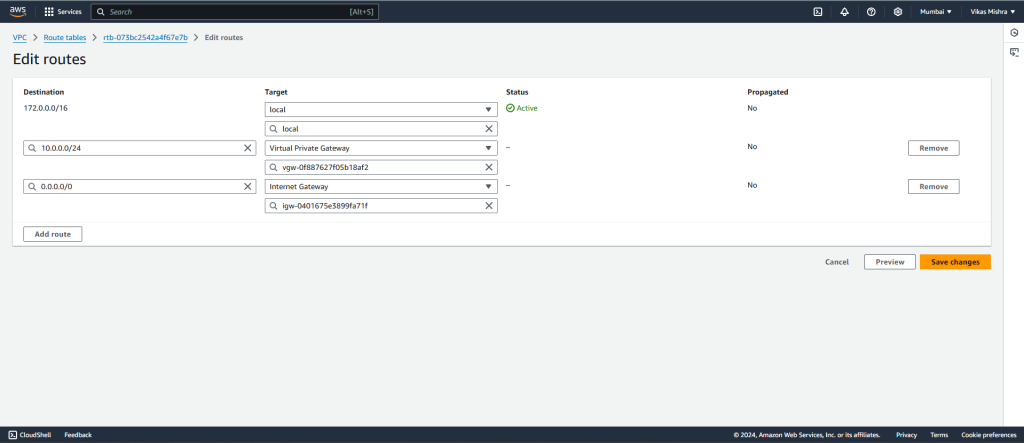
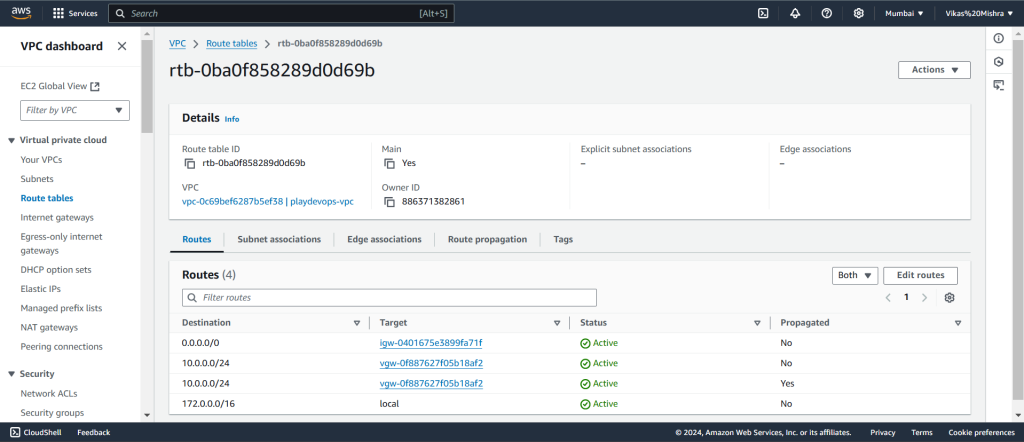
Now you can see the updated Route Table rules
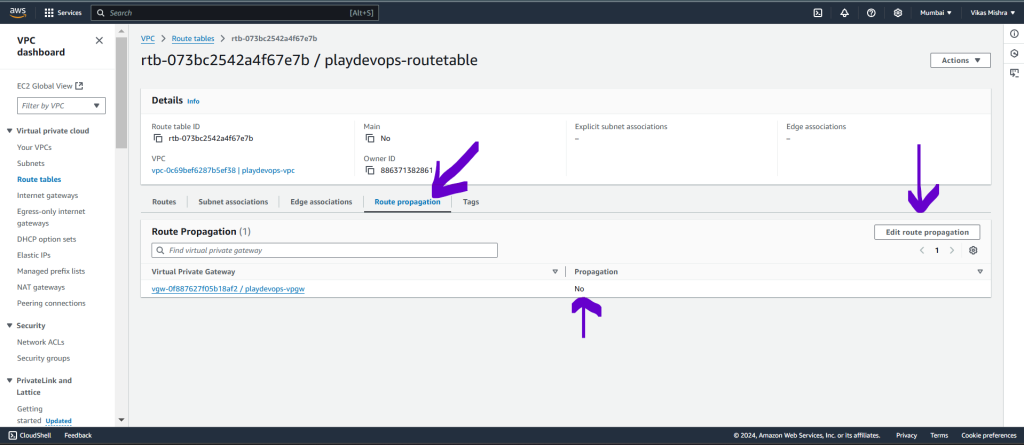
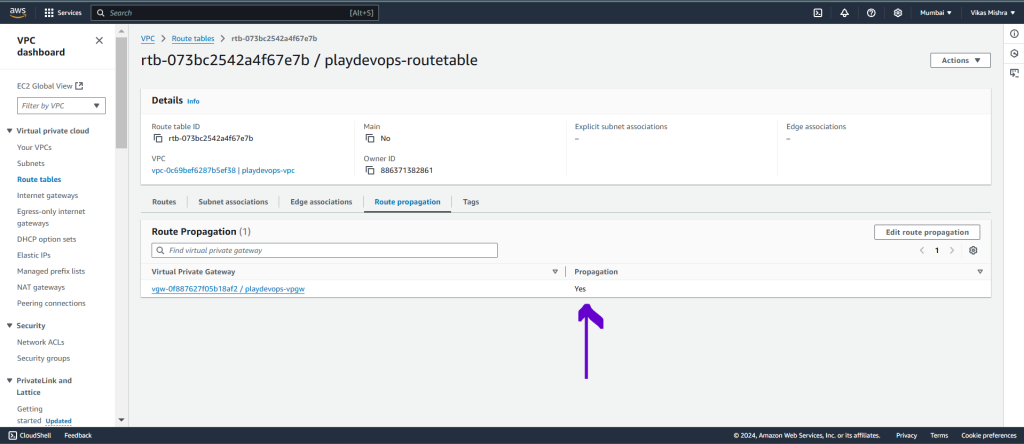
Now to verify the Route propagation, click on the tab, If it not propagated then we need to enable propagation by editing it. Hit on Edit route propagation as shown in below image.
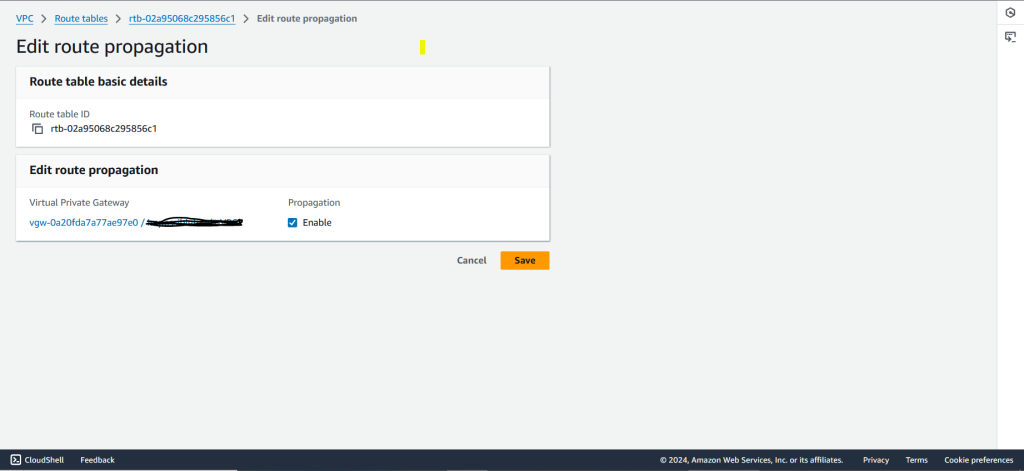
Check the Enable checkbox next to VPG to enable propagation and save it as shown in below image.
Once enabled we can see the status as Yes as shown in below image.
Step 3: Edit Route Table in Azure
We need to add the route of AWS VPC CIDR to Azure Virtual Network Gateway as shown in below image. Click on Add.
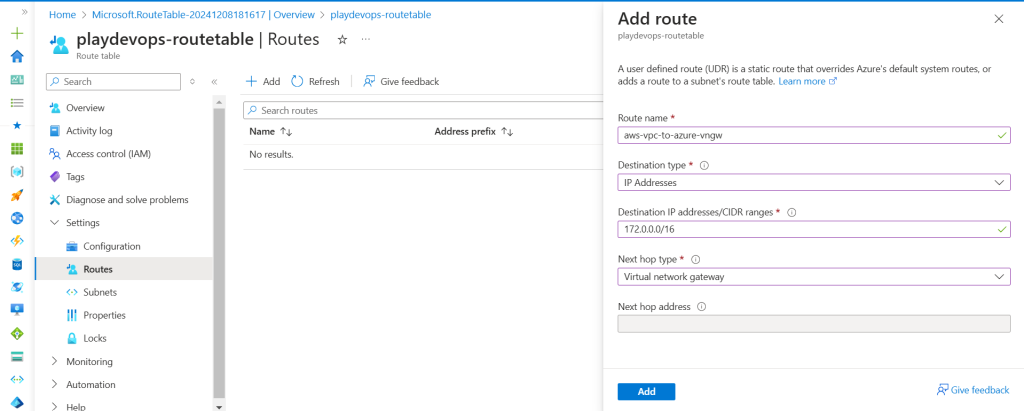
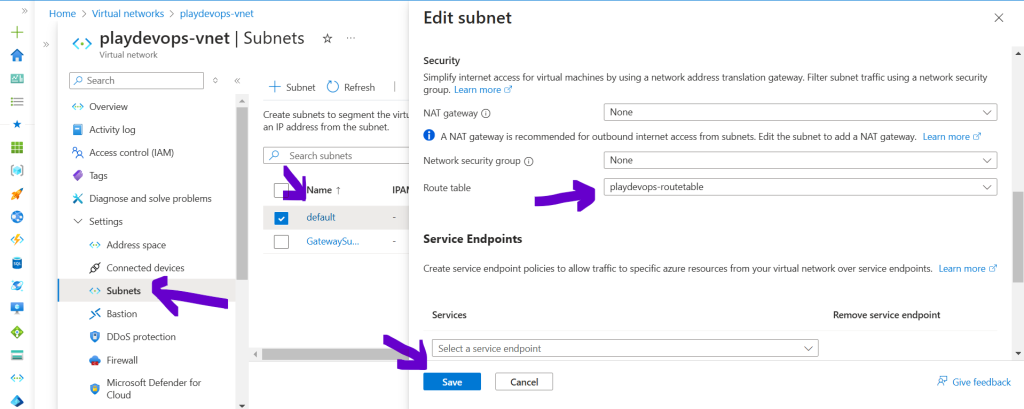
Now Route Table is ready and needs to be attached to Azure default subnet.
Go to Azure VNET and select the default subnet. Now select the Route table form dropdown as shown in below image and hit on Save.
Step 4: Create Network Security Group in Azure
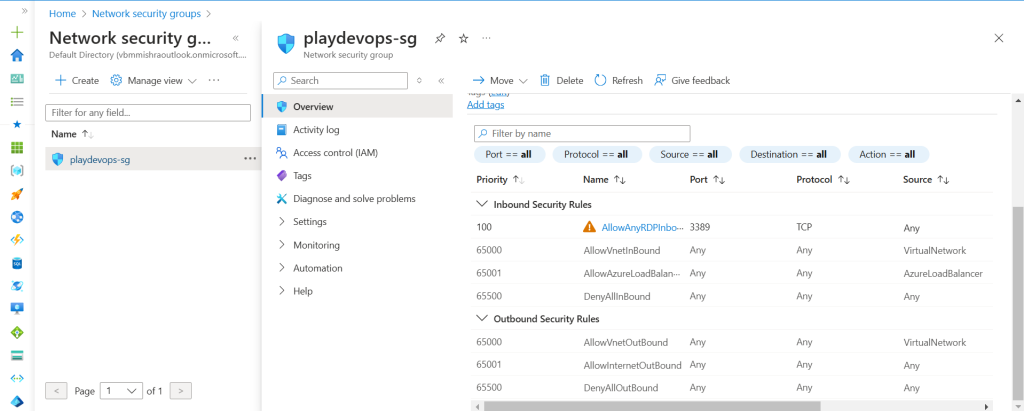
Create the NSG in Azure and allow only 3389 RDP rule to accept the RDP from AWS.
If you want to take RDP from Azure to AWS, You need to enable All ICMP IPv4 Rule in Outbound. Here we are only going to add RDP inbound rule.
Step 5: Create Security Group in AWS
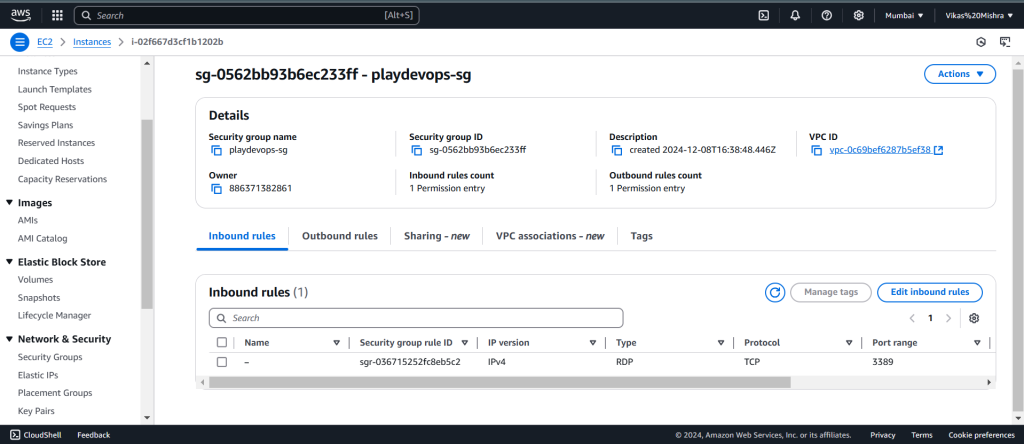
Here We need to create the SG and Edit Inbound rule to allow RDP at 3389 port as shown in below image. We will also add the second rule in Outbound “All ICMP IPv4 Rule” to Any or Azure VNET CIDR as we are going to take RDP of Azure server from AWS server.
Step 6: Create Virtual Machine in Azure
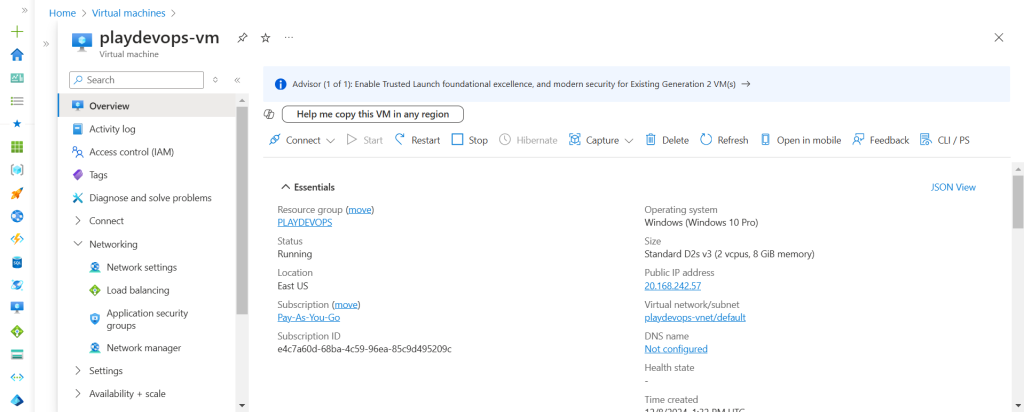
Create VMs in Azure inside existing VNET to which you want to be accessed from AWS server. Attached snap of a VM below.
Step 7: Create EC2 in AWS
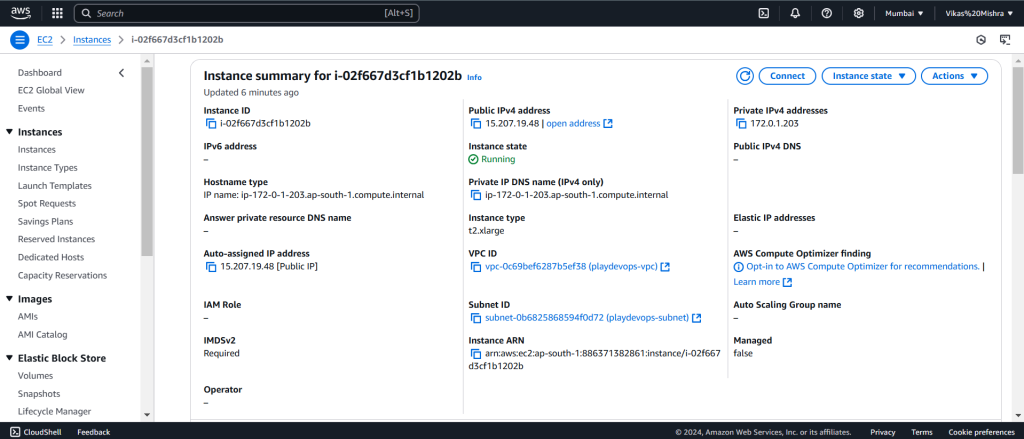
Similarly, Create EC2 instance in AWS from which we are going to take the RDP of Azure server. For reference attached EC2 snap below.
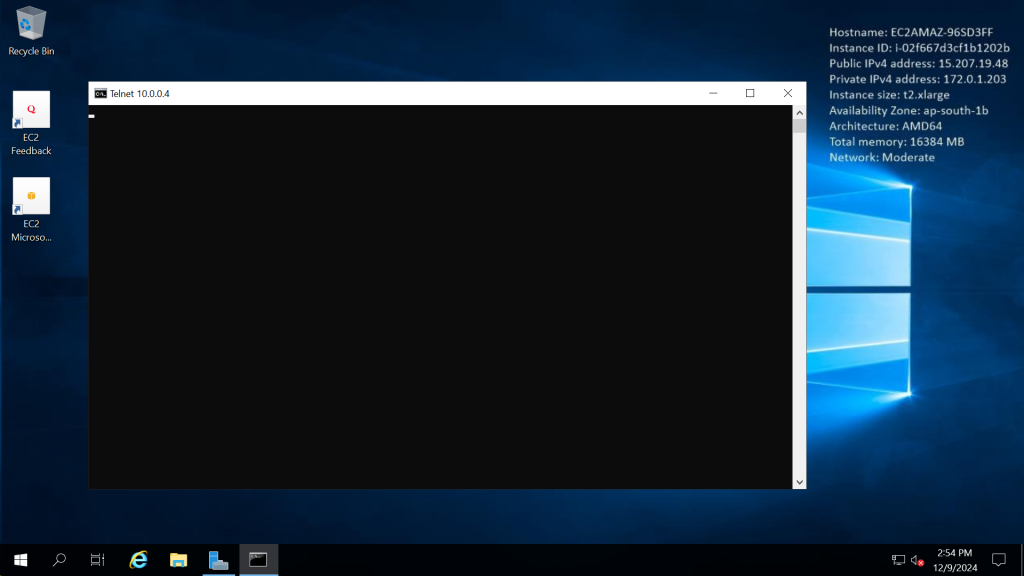
Now we will try to telnet the Private IP of Azure VM and AWS EC2. If the telnet of Private IP is successful then connectivity is right else we need to check the NSG and route table of Azure and AWS
Telnetting private IP of Azure VM from AWS server in below image.
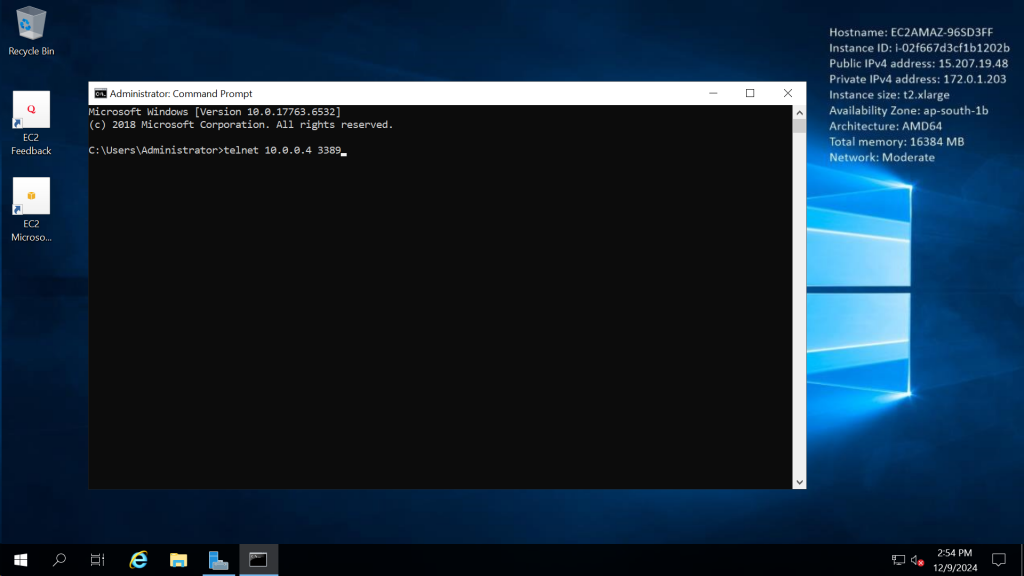
We can see the telnet of Azure VM is successful, That means we can take RDP of this server.
Lets telnet the Private IP of AWS server from Azure VM as shown in below image
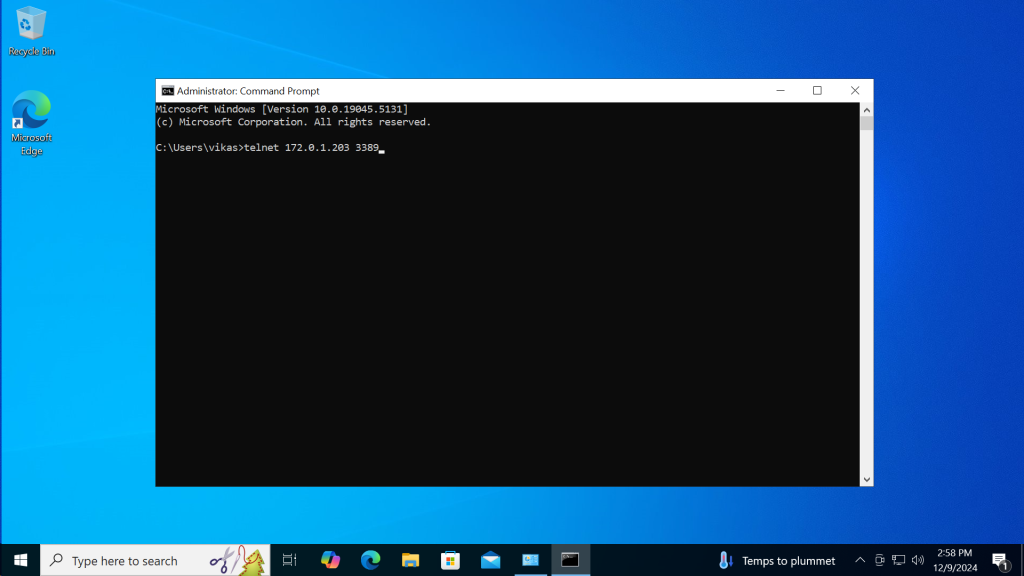
We can see the telnet of AWS server from Azure VM is successful as shown in below image.
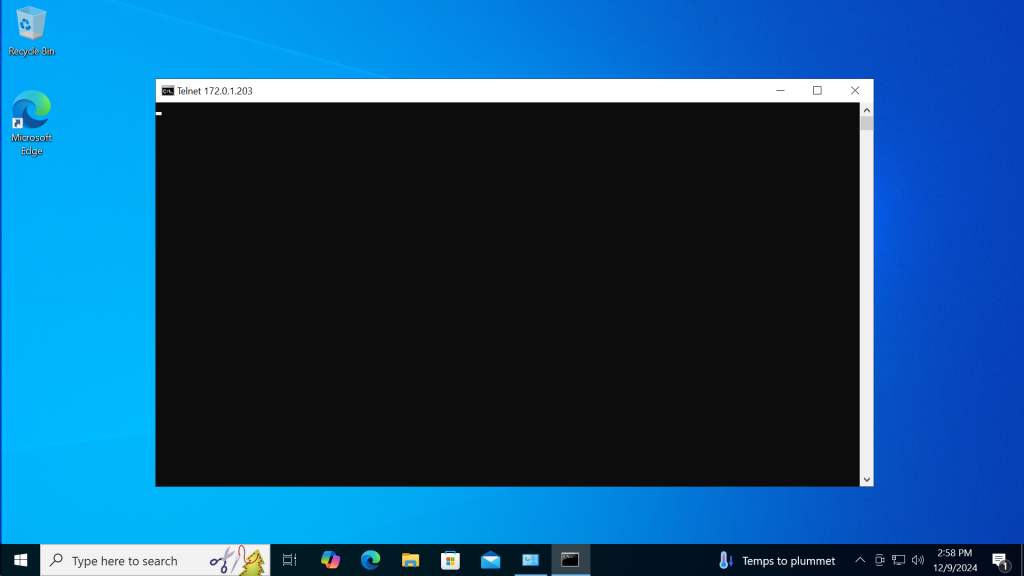
Now, we can use RDP to access each other’s servers.
If you are trying to Ping each other’s Servers and you are getting time out result then go ahead and disable the local firewall in each server and add the rule in SG in outbound rule allow all ICMP IPv4 to VNET or VPC CIDR.
We have successfully completed the setup of the Site-to-Site tunnel between Azure and AWS.
Now, We have setup the Azure AWS tunnel in Active Passive mode, means we have created only one tunnel between them, If we want more availability or as per production requirement we should setup two tunnel at a time so that if something happens with First tunnel, Second tunnel will be functional and traffic will not stop between Azure and AWS.
[Optional] – How to Setup Two Tunnel in Azure in Active Active Mode
To setup Azure tunnel in Active Active mode,
Step 1 : Create another Public IP for Azure VPN Gateway
We already have once public IP which is associated with Azure VPN Gateway but we will have to create another Public IP to use in Active Active mode of Azure VPN Gateway.
Once, Public IP has been created, then we need to enable Active Avtive mode in Azure VPN Gateway
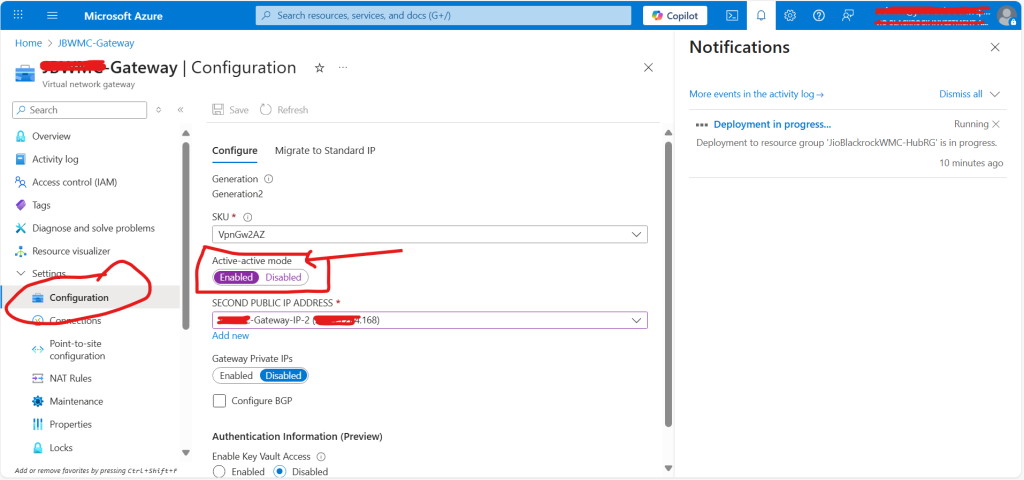
Step 2 : Enable Avtive Active Mode in Azure VPN Gateway
Open existing Azure VPN Gateway and navigate to “Configuration” . By default active active mode is disabled, We need to enable the toggle button for as shown in below snap to enable it. It might take 20 Min to 50 Min to save the changes.
If you encounter any issues after following the steps above, please share your problem here along with a screenshot and error details, and we will work to resolve it as quickly as possible.
Quick Fix
If you are not able to ping Azure’s Private IP from AWS server then you might need to make small changes inside Azure Virtual Network Gateway and Azure Local Network Gateway.
First enable the Azure Private IP Access in Azure Virtual Network Gateway as mentioned in Phase 1 > Step 4 as Optional, it might take from 10 Min to 30 Min to get deployed. 0nce the deployment is succeeded then enable the Azure Private IP Access in Azure Local Gateway Connection’s configuration as shown in below image.
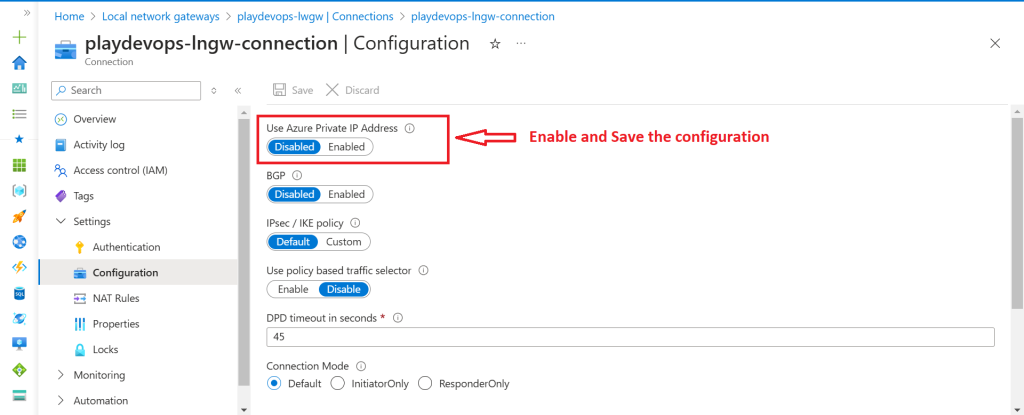
Once all the deployment is successful. Try to Ping the each other’s servers.
Match the IPsec / IKE policy in Azure using AWS VPN configuration file. Go to Azure Local Network Gateway > Connection > Select the Connection > Go to Connection’s Configuration and Toggle the IPSec / IKE policyt button to “Custom” and then enter the desired attributes like shown in below snap.
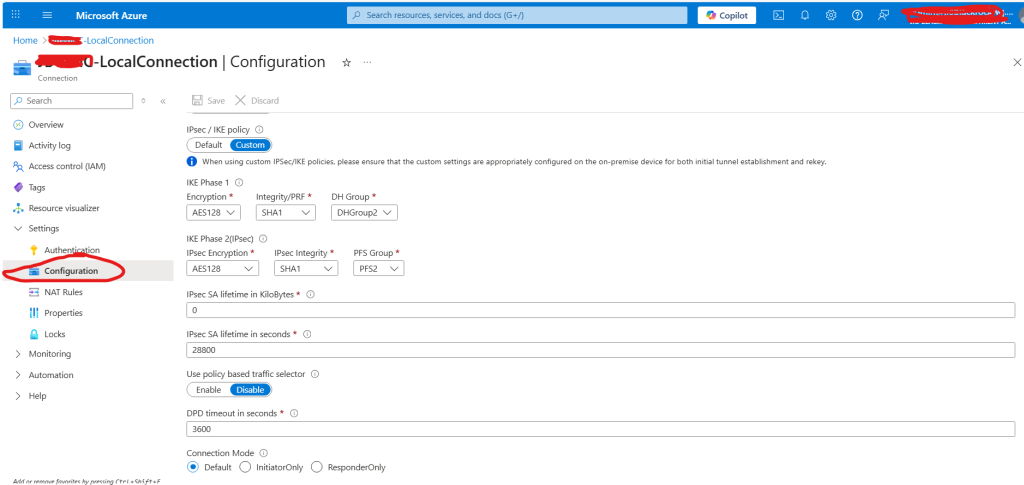
AWS Multiple VPC Peering
If there are multiple VPC avaialble in AWS and VPC are peered and let’s say you have configured your tunnel to VPC-1 and you are able to ping or telnet the server which is inside VPC-1, But if you want to ping or telnet the servers which are inside VPC-2, you won’t be able to do that. To fix that >>> start editing here
To ping any server which is in different peered VPC, We will have to add the VPC-2 or other VPCs CIDR in Azure Local Network Gateway configuration in “Add Additional Address Range” and hit on Save like shown in below snapshot. Once the CIDR added, Reset the VPN gateway, either by searching “Reset” or under Help menu you will find reset.
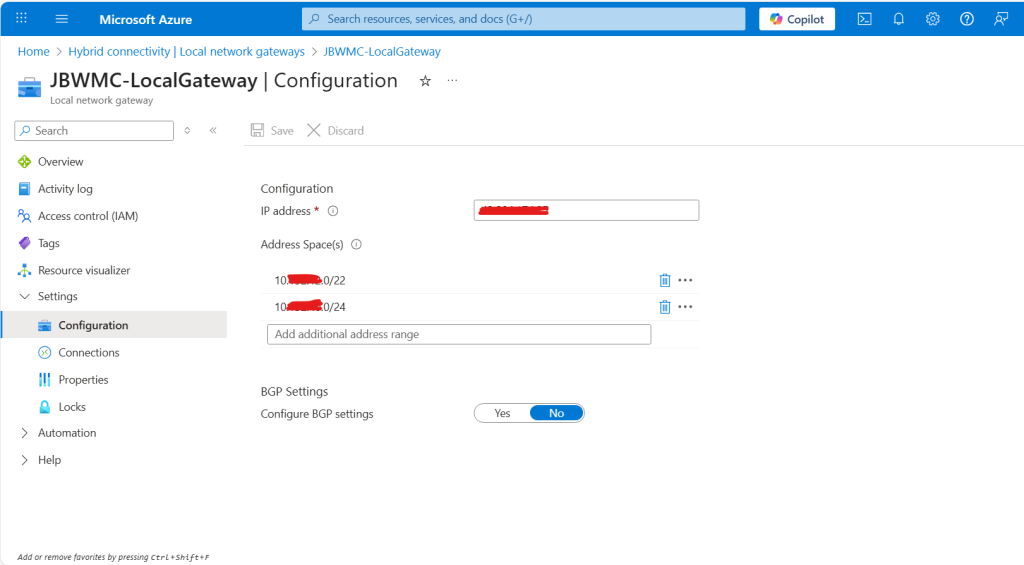
Now After Saving the CIDR. Hit on Reset and Now Ping and Telnet in New CIDR.
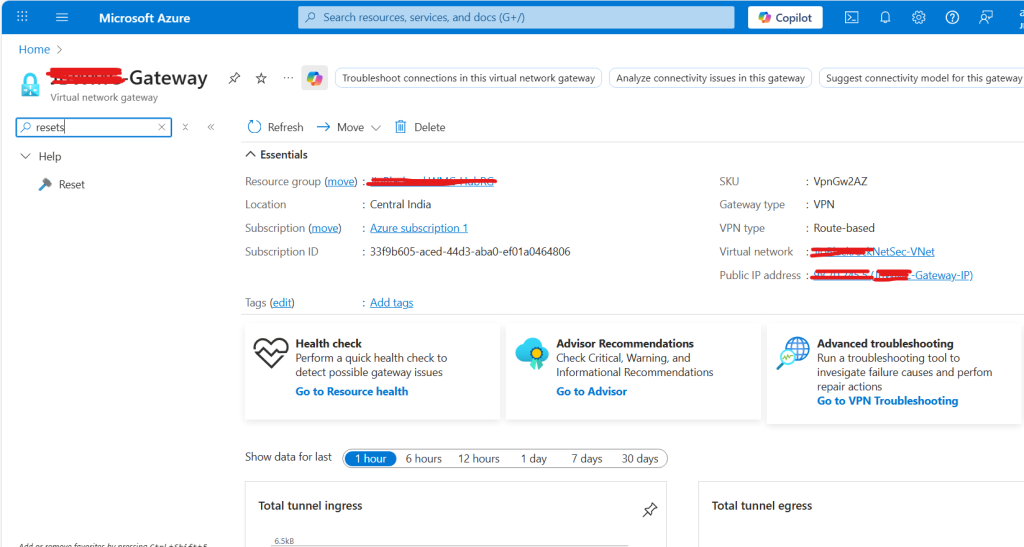
That concludes our step-by-step guide on setting up the Site-to-Site tunnel between Azure and AWS. We’ve covered all the necessary steps to ensure a successful configuration. Thank you for reading, and feel free to reach out if you have any questions or feedback.
Next we are going to setup the Tunnel between AWS – GCP and Azure – GCP. Stay updated with PlayDevOps.

This kind of sharing makes tech better for everyone.
You’ve turned a lightbulb on for me.
Applied this to my project and it solved a major bottleneck.
You’ve made a tough concept feel intuitive.
Brilliant breakdown—this really clarified a complex topic!
Your content is raising the bar in tech education.
I wish I had this when I was learning.
This should be required reading for developers.
Great use of modular design principles!
Thank you for simplifying the complicated!
Grateful for your generosity in sharing this.
This is the kind of content we need more of.
You’ve got a talent for teaching technical topics.
Looking forward to more posts like this!
This post highlights some subtle but crucial details.
Makes me want to dig deeper into this subject.
Great points—especially about the trade-offs.
This raises some important questions. Thanks!
This really got me thinking differently about the topic.
Rare to find posts this useful. Well done!
Applied this at work today—thanks!
I’ll definitely be using this in a project.
Bookmarked for future reference!
I implemented this right after reading. Works great!
Excellent use of visuals to support your explanation.
Your approach to solving this problem is smart.
This could be part of a technical manual—great job!
You made a tough subject feel approachable.
Always learn something new from your posts!
Clean and concise explanation—well done!
Great write-up. Very informative!
This was super insightful—thanks for sharing!